Render mode for Server & WebAssembly Blazor components
Published: Friday 27 October 2023
Different render modes can be set for Razor components in the same Blazor application with .NET 8.
Blazor Web App template in Visual Studio
A new Blazor Web App template has been created in Visual Studio for .NET 8 projects. When going through the steps, there are a number of configuration options that can be set.
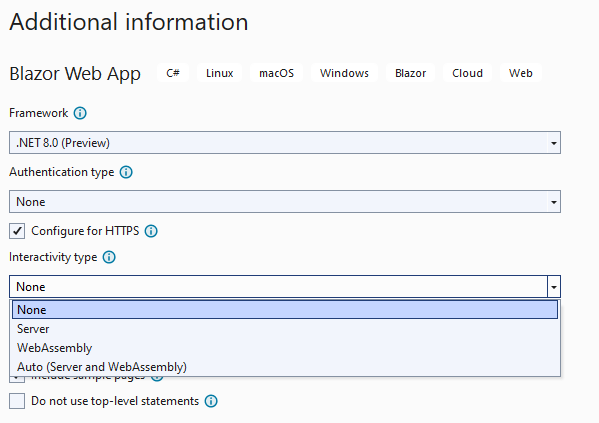
Blazor render modes for creating a project
Interactivity type
These are the options that can be set for the interactivity type:
- None - This renders components using SSR by default.
- Server - This renders components with Blazor Server by default
- WebAssembly - This renders components with Blazor WebAssembly by default
- Auto - This combines both Server and WebAssembly render modes
Auto mode
The new "Auto" mode uses the Server render mode initially to download the component from the server. But in the background, it downloads the application to the browser like the WebAssembly render mode. This is used for caching and allows for faster render times after the initial page load.
Interactivity location
Another configuration option is the Interactivity location. This decides whether the application has the render mode configuration set on a per-component basis, or globally.
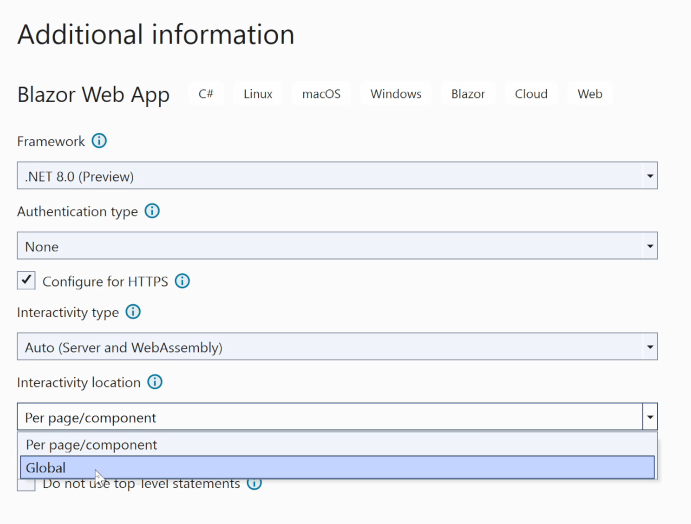
Adding Interactivity location to a Blazor project in Visual Studio
Per page/component project
If "Per/page component" is selected, the render mode has to be specified per Razor component. If it's not, it will default to the SSR render mode and will not have front-end functionality.
The App component
The App component is the entry component for the Blazor application. Within that, it references a Routes component which routes to the correct component depending on the URI. A @rendermode attribute can be set for the Routes component, but if it's not specified, it will default to the SSR render mode.
<!-- App.razor -->
<!DOCTYPE html>
<html lang="en">

<head>
    <meta charset="utf-8" />
    <meta name="viewport" content="width=device-width, initial-scale=1.0" />
    <base href="/" />
    <link rel="stylesheet" href="bootstrap/bootstrap.min.css" />
    <link rel="stylesheet" href="app.css" />
    <link rel="stylesheet" href="BlazorApp1.styles.css" />
    <link rel="icon" type="image/png" href="favicon.png" />
    <HeadOutlet />
</head>

<body>
    <Routes />
    <script src="_framework/blazor.web.js"></script>
</body>

</html>
The @rendermode attribute
If any components require front-end functionality, the render mode needs to be configured in the component. These can be set with the RenderMode class with either:
RenderMode.InteractiveServerRenderMode.InteractiveWebAssemblyRenderMode.InteractiveAuto
In the default project that gets created when creating a Blazor application, there is a Counter component that allows the user to increase the number every time the button is clicked.
@* Counter.razor *@
@page "/counter"
@rendermode RenderMode.InteractiveServer
<PageTitle>Counter</PageTitle>

<h1>Counter</h1>

<p role="status">Current count: @currentCount</p>

<button class="btn btn-primary" @onclick="IncrementCount">Click me</button>

@code {
    private int currentCount = 0;

    private void IncrementCount()
    {
        currentCount++;
    }
}
Global project
If "Global" is selected when creating a project, it will add a @rendermode attribute to the Routes reference in the App Razor component.
@rendermode set as RenderMode.InteractiveServer meaning all components will render using Server by default.
<!-- App.razor -->
<!DOCTYPE html>
<html lang="en">

<head>
    <meta charset="utf-8" />
    <meta name="viewport" content="width=device-width, initial-scale=1.0" />
    <base href="/" />
    <link rel="stylesheet" href="bootstrap/bootstrap.min.css" />
    <link rel="stylesheet" href="app.css" />
    <link rel="stylesheet" href="RoundTheCode.BlazorRenderModes.styles.css" />
    <link rel="icon" type="image/png" href="favicon.png" />
    <HeadOutlet @rendermode="@RenderMode.InteractiveServer" />
</head>

<body>
    <Routes @rendermode="@RenderMode.InteractiveServer" />
    <script src="_framework/blazor.web.js"></script>
</body>

</html>
As a result, we only need to specify the @rendermode attribute in a component if we want to use another render mode.
Configuration
In-order to support Server and WebAssembly components in the same application, configuration needs to be made in the Program.cs file.
AddRazorComponents method that is called as part of the IServiceCollection.
AddInteractiveServerComponents extension method will support components to be rendered for Server and the AddInteractiveWebAssemblyComponents extension method will do the same for WebAssembly.
MapRazorComponents extension method which is called as part of the WebApplication instance needs to have the AddInteractiveServerRenderMode and AddInteractiveWebAssemblyRenderMode extension methods called for support for both Server and WebAssembly render modes.
// Program.cs
var builder = WebApplication.CreateBuilder(args);

// Add services to the container.
builder.Services.AddRazorComponents()
    .AddInteractiveServerComponents()
    .AddInteractiveWebAssemblyComponents();

var app = builder.Build();

...

app.MapRazorComponents<App>()
    .AddInteractiveServerRenderMode()
    .AddInteractiveWebAssemblyRenderMode()
    .AddAdditionalAssemblies(typeof(Counter).Assembly);

app.Run();
Selecting WebAssembly
When setting up the project and selecting either the WebAssembly or Auto render modes, two projects will be set up. One will include the server-side project which configures the render modes for the application.
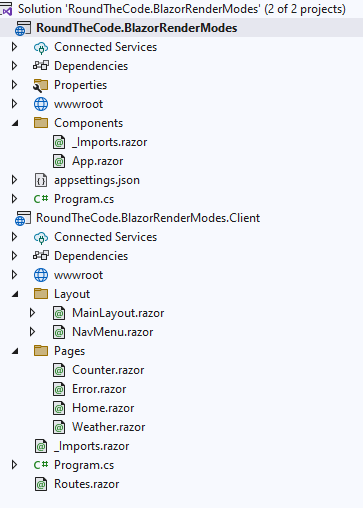
Blazor WebAssembly project in a Blazor Web App
Watch the video
Watch the video where we talk through the different render modes in Blazor and go through each one to see how they are configured different.
Related pages