
What is JWT and how to add it to ASP.NET Core
Published: Friday 28 April 2023
JWT stands for JSON Web Token which holds payload data that asserts a number of claims.
It can be securely transmitted from the server using a signing key with the HMAC algorithm. This means that a HTTP request to an API endpoint can be authenticated with this signing key before granting access.
JWT's can be used for security as part of the OAuth Client Credentials flow. The server validates the client credentials using Basic authentication and generates an access token in the form of a JWT. From there it can be used for authentication for other API endpoints by adding it to the Authorization header as a Bearer token.
In this tutorial, we are going to add JWT authentication to an ASP.NET Core Web API using C#. Before that, we implemented Basic authentication to authenticate the client, and this tutorial will follow on from it.
Add NuGet package
In ASP.NET Core, the Microsoft.AspNetCore.Authentication.JwtBearer middleware is available as a NuGet package. This enables the application to receive a Bearer token. This will need to be added to our ASP.NET Core web app before we can generate a JWT.
JWT claims
There are a number of claims that can be added to JWT. These include:
Issuer - Identifies who issued the JWT
Audience - Identifies the receipients that the JWT is intended for
In-addition, we can add a signing key which is a secret that can be used to verify an access token.
As these values aren't likely to change everytime a token is generated, these can be stored as app settings.
Let's go ahead and update the appsettings.json file with these values by creating a JwtBearer section in the configuration.
{
	"Logging": {
		"LogLevel": {
		  "Default": "Information",
		  "Microsoft.AspNetCore": "Warning"
		}
	},
	"AllowedHosts": "*",
	"JwtBearer": {
		"Issuer": "RoundTheCode",
		"Audience": "localhost:9904",
		"SigningKey": "uhfh4ut83289nfsdHAUSIH"
	}
}
Afterwards, let's create a class that will store these values.
// JwtBearerSettings.cs
namespace RoundTheCode.JwtBearer.Shared
{
	public class JwtBearerSettings
	{
		public string Issuer { get; set; }

		public string Audience { get; set; }

		public string SigningKey { get; set; }
	}
}
Add settings as options
With the settings created, it needs to be added as options to the ASP.NET Core configuration. This can be done using the AddOptions extension method in the ServiceCollection instance.
It binds the JwtBearerSettings class to the JwtBearer section in the configuration and is added to the IoC container for use with dependency injection.
We didn't specify any data annotations in the settings, but there is an option to validate them. This is useful if there are settings that are required, or a setting has to be in a particular format.
// Program.cs
...
builder.Services.AddOptions<JwtBearerSettings>()
    .Bind(builder.Configuration.GetSection("JwtBearer"))
    .ValidateDataAnnotations();

var app = builder.Build();
...
Configure JWT in ASP.NET Core
We can now configure JWT in our ASP.NET Core web app in the Program.cs file.
By default, we want to challenge and authenticate using the JWT Bearer authenticate scheme. To do that, we need to add some options when adding the authentication. The DefaultChallengeScheme and DefaultAuthenticateScheme properties in the AuthenticationOptions instance allows us to do this.
// Program.cs
...
builder.Services.AddAuthentication(options =>
{
    options.DefaultChallengeScheme = JwtBearerDefaults.AuthenticationScheme;
    options.DefaultAuthenticateScheme = JwtBearerDefaults.AuthenticationScheme;
})
.AddScheme<AuthenticationSchemeOptions, BasicAuthenticationHandler>(BasicAuthenticationDefaults.AuthenticationScheme, null);

var app = builder.Build();
...
However, this is not going to work on its own as we need to add JWT Bearer as an authentication scheme. When adding the scheme, we can set a number of token validation parameters like the issuer, audience and signing key. In-addition, we can choose whether to validate against these claims before successful authentication.
// Program.cs
...
builder.Services.AddAuthentication(options =>
{
	options.DefaultChallengeScheme = JwtBearerDefaults.AuthenticationScheme;
	options.DefaultAuthenticateScheme = JwtBearerDefaults.AuthenticationScheme;
})
.AddScheme<AuthenticationSchemeOptions, BasicAuthenticationHandler>(BasicAuthenticationDefaults.AuthenticationScheme, null)
.AddScheme<JwtBearerOptions, JwtBearerHandler>(JwtBearerDefaults.AuthenticationScheme, options =>
{
	var jwtBearerSettings = builder.Configuration.GetSection("JwtBearer").Get<JwtBearerSettings>();

	if (jwtBearerSettings == null)
	{
		// Cannot find JWT Bearer Settings settings, so throw exception
		throw new NullReferenceException("The 'JwtBearer' section cannot be found in the configuration");
	}
	options.SaveToken = true;
	options.TokenValidationParameters = new TokenValidationParameters()
	{
		ValidIssuer = jwtBearerSettings.Issuer,
		ValidAudience = jwtBearerSettings.Audience,
		IssuerSigningKey = new SymmetricSecurityKey(Encoding.UTF8.GetBytes(jwtBearerSettings.SigningKey)),
		ClockSkew = TimeSpan.Zero,
		ValidateIssuer = true,
		ValidateAudience = true,
		ValidateIssuerSigningKey = true
	};
});

var app = builder.Build();
...
By default, MVC and API controllers have anonymous authentication. This means they do not have to be authenticated to be executed. If we want controllers to be authenticated, we can use the RequireAuthorization extension method when mapping the controllers.
This will authenticate controllers using the default scheme. As this is set as JWT Bearer, this is the scheme that will be used.
The advantage of doing it this way is that new API endpoints require authentication before they can be executed.
// Program.cs
...
app.MapControllers().RequireAuthorization();

app.Run();
Configure JWT for Swagger
We can add JWT to Swagger as a security definition and requirement. This will allow us to add the Bearer token as part of the request and can be added alongside other authentication methods such as Basic authentication.
// Program.cs
...
builder.Services.AddEndpointsApiExplorer();
builder.Services.AddSwaggerGen(options =>
{
	options.AddSecurityDefinition(BasicAuthenticationDefaults.AuthenticationScheme, new OpenApiSecurityScheme()
	{
		Name = "Authorization",
		Type = SecuritySchemeType.Http,
		Scheme = BasicAuthenticationDefaults.AuthenticationScheme,
		In = ParameterLocation.Header,
		Description = "Basic Authorization header.\r\n\r\nEnter the client ID as the Username, and the plain client secret as the password",
	});
	options.AddSecurityRequirement(new OpenApiSecurityRequirement {
		{
			new OpenApiSecurityScheme {

				Reference = new OpenApiReference {
					Type = ReferenceType.SecurityScheme,
						Id = BasicAuthenticationDefaults.AuthenticationScheme
				}
			},
			new string[] { "Basic "}
		}
	});
	options.AddSecurityDefinition(JwtBearerDefaults.AuthenticationScheme, new OpenApiSecurityScheme()
	{
		Name = "Authorization",
		Type = SecuritySchemeType.Http,
		Scheme = JwtBearerDefaults.AuthenticationScheme,
		BearerFormat = "JWT",
		In = ParameterLocation.Header,
		Description = "JWT Authorization header using the Bearer authentication scheme.\r\n\r\nEnter your token in the text input below.",
	});
	options.AddSecurityRequirement(new OpenApiSecurityRequirement {
		{
			new OpenApiSecurityScheme {

				Reference = new OpenApiReference {
					Type = ReferenceType.SecurityScheme,
						Id = JwtBearerDefaults.AuthenticationScheme
				}
			},
			new string[] { "Bearer "}
		}
	});
});
...
Add an identity
When generating a token, we want to store information about the identity, such as the name, authentication type and whether they are authenticated. This can be set up using the IIdentity interface.
// JwtBearerClient.cs
using System.Security.Principal;

namespace RoundTheCode.JwtBearer.Shared.Authentication.JwtBearer
{
	public class JwtBearerClient : IIdentity
	{
		public string? AuthenticationType { get; set; }

		public bool IsAuthenticated { get; set; }

		public string? Name { get; set; }
	}
}
Generate JWT
With the configuration set up, a JWT can be generated. This is done within an endpoint in the controller.
The request has to be authenticated using client credentials before being executed and this can be done with Basic authentication. In this example, the BasicAuthorization attribute is added to the API endpoint.
With the Client Credentials flow in the OAuth 2.0 framework, a HTTP POST request is sent with a grant_type parameter. If this is not set to client_credentials, it should throw a 400 Bad Request error code.
// OAuthController.cs
public class OAuthController : Controller
{
	...
	[HttpPost("token"), BasicAuthorization, Consumes("application/x-www-form-urlencoded")]
	public IActionResult Token([FromForm(Name = "grant_type")] string grantType)
	{
		if (grantType != "client_credentials")
		{
			// Grant type must be set as 'client_credentials' otherwise it throws a bad request
			return BadRequest(new { error = "invalid_grant", error_description = "The grant type form value must be set as 'client_credentials'" });
		}
	...
}
Afterwards, it generates the token. It authenticates the client and sets any claims. This includes when the token was issued and when it expires.
Finally, it returns the access token as part of the response, along with the token type and how many seconds it expires in.
// OAuthController.cs
using Microsoft.AspNetCore.Authentication.JwtBearer;
using Microsoft.AspNetCore.Mvc;
using Microsoft.Extensions.Options;
using Microsoft.IdentityModel.Tokens;
using RoundTheCode.BasicAuthentication.Authentication.Basic.Attributes;
using RoundTheCode.JwtBearer.Shared;
using RoundTheCode.JwtBearer.Shared.Authentication.JwtBearer;
using System.IdentityModel.Tokens.Jwt;
using System.Security.Claims;
using System.Text;
namespace RoundTheCode.JwtBearer.WebApi.Controllers
{
[Route("[controller]")]
public class OAuthController : Controller
{
private readonly JwtBearerSettings _jwtBearerSettings;
public OAuthController(IOptions<JwtBearerSettings> jwtBearerSettingsOptions)
{
_jwtBearerSettings = jwtBearerSettingsOptions.Value;
}
[HttpPost("token"), BasicAuthorization, Consumes("application/x-www-form-urlencoded")]
public IActionResult Token([FromForm(Name = "grant_type")] string grantType)
{
if (grantType != "client_credentials")
{
// Grant type must be set as 'client_credentials' otherwise it throws a bad request
return BadRequest(new { error = "invalid_grant", error_description = "The grant type form value must be set as 'client_credentials'" });
}
// Generate JWT Token
var tokenHandler = new JwtSecurityTokenHandler();
var now = DateTime.UtcNow;
var expiry = now.Add(TimeSpan.FromHours(1));
var jwtBearerAuthenticatedClient = new JwtBearerClient
{
IsAuthenticated = true,
AuthenticationType = JwtBearerDefaults.AuthenticationScheme,
Name = "RoundTheCode"
};
// Write the token and return it.
var token = tokenHandler.WriteToken(tokenHandler.CreateToken(new SecurityTokenDescriptor
{
Subject = new ClaimsIdentity(jwtBearerAuthenticatedClient, new List<Claim>
{
{ new Claim(JwtRegisteredClaimNames.Name, "Round The Code") }
}),
Expires = expiry,
Issuer = _jwtBearerSettings.Issuer,
Audience = _jwtBearerSettings.Audience,
SigningCredentials = new SigningCredentials(new SymmetricSecurityKey(Encoding.UTF8.GetBytes(_jwtBearerSettings.SigningKey)), SecurityAlgorithms.HmacSha512Signature),
IssuedAt = now,
NotBefore = now,
}));
return Ok(new { access_token = token, token_type = JwtBearerDefaults.AuthenticationScheme, expires_in = expiry.Subtract(DateTime.UtcNow).TotalSeconds.ToString("0") });
}
}
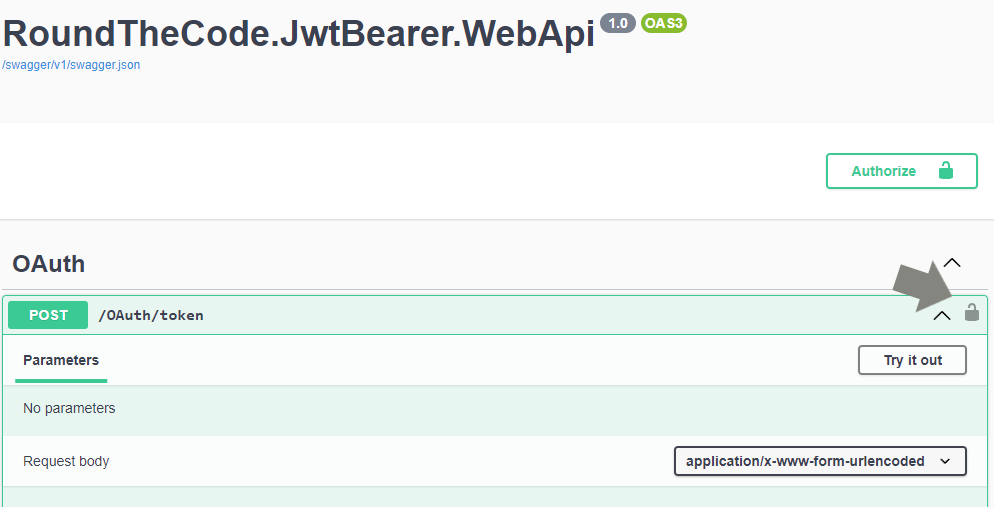
}Testing in Swagger
As we are using Basic authentication to generate a token, we need to add the login credentials into Swagger.
This is so the Base64 encoded hash of the client credentials is added to the Authorization header of the request.
In Swagger, click on the padlock icon, and add both the username and password as roundthecode.
Add Basic authentication when generating a JWT in Swagger
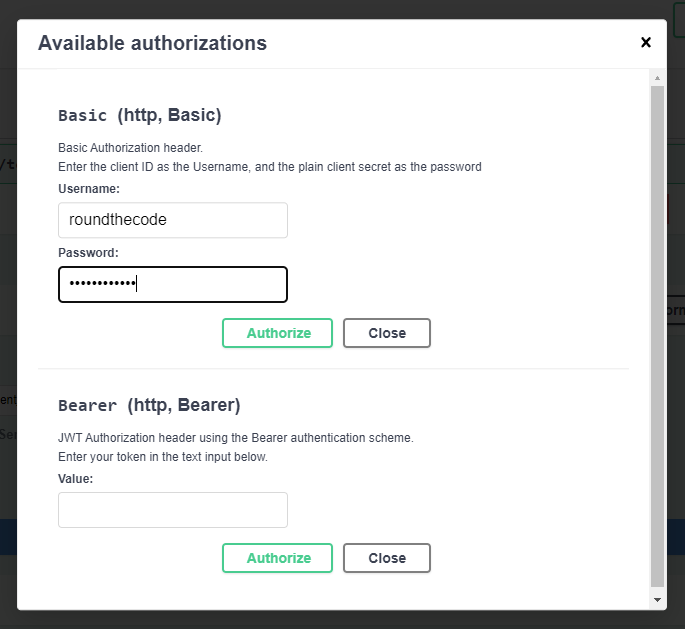
Add Basic authentication credentials when generating a JWT in Swagger
Ensure that the grant_type is set as client_credentials and execute the endpoint. An access token is generated.
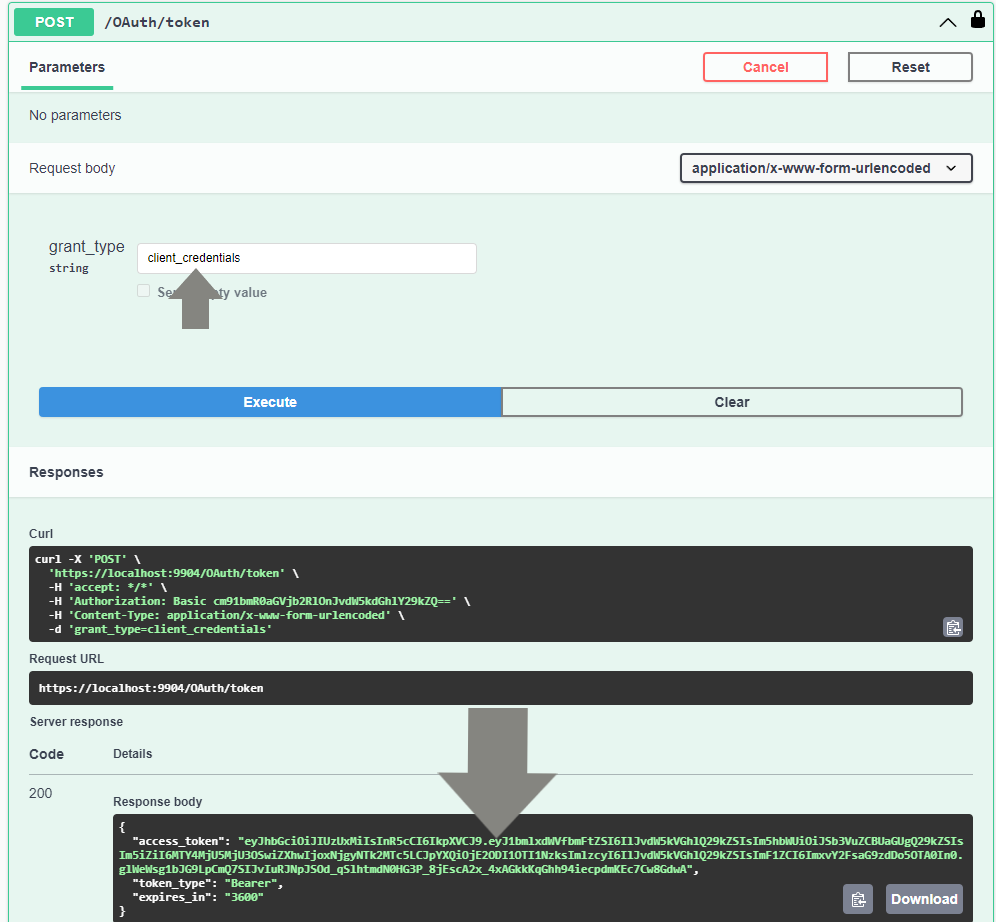
Generate a JWT token in Swagger
How to use the access token
Watch our video where we show you how to use the access token in an API endpoint. In-addition, we show you how to add JWT Bearer functionality to an ASP.NET Core Web API and how to test it.
In-addition, you can download the code example used in this tutorial.
How to decode a JWT
The JWT website has the functionality to decode a JSON Web Token. This is so we can debug the payload and validate the token against the signing key.
For this, we are going to decode the following JWT:
eyJhbGciOiJIUzUxMiIsInR5cCI6IkpXVCJ9.eyJ1bmlxdWVfbmFtZSI6IlJvdW5kVGhlQ29kZSIsIm5hbWUiOiJSb3VuZCBUaGUgQ29kZSIsIm5iZiI6MTY4MjUyMDEzOCwiZXhwIjoxNjgyNTIzNzM4LCJpYXQiOjE2ODI1MjAxMzgsImlzcyI6IlJvdW5kVGhlQ29kZSIsImF1ZCI6ImxvY2FsaG9zdDo5OTA0In0.dFQrmzkAsoWD5Nu8masVFx0FUbMfsntUuMj8qJhnZYQ8-NTHpPowf3W5rNWrmYx3pJtCPc1KLyJOR9qsCASIhgWe are given information about the algorithm and token type as well as data from the payload. In-addition, we can verify the signature by adding the signing key which is uhfh4ut83289nfsdHAUSIH.
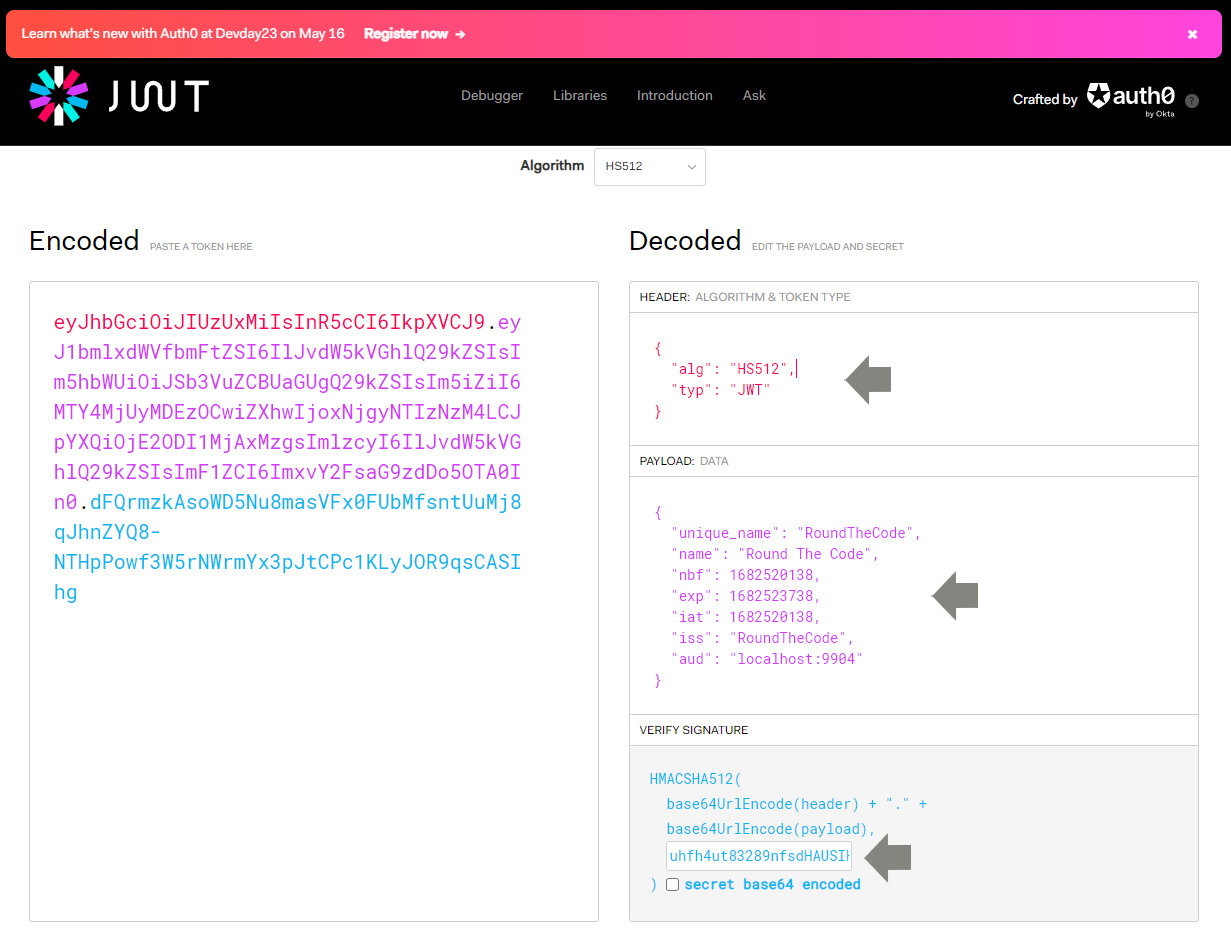
Decode a JWT for payload data and verify a signature
From the JWT debugger, we can see the decoded token contains the following fields from the payload:
{
	"unique_name": "RoundTheCode",
	"name": "Round The Code",
	"nbf": 1682520138,
	"exp": 1682523738,
	"iat": 1682520138,
	"iss": "RoundTheCode",
	"aud": "localhost:9904"
}
Here's an idea what each field means:
- unique_name - The name of the user that should be authenticated with this token
- name - An optional claim which has been set with the name type
- nbf - Stands for "Not valid before". A timestamp to indicate the time when the token is valid from.
- exp - Stands for "Expires". A timestamp to indicate when the token expires.
- iat - Stands for "Issued at". A timestamp to indicate when the token was issued at.
- iss - Stands for "Issuer". Basically telling us who created the token.
- aud - Stands for "Audience". Who or what the token is intended for.
Of course, we can add a number of other claims to the payload. Just remember that claims can be decoded so avoid adding any sensitive data to the payload.
Related tutorials
