Data Annotations for model validation in ASP.NET Core
way of performing model validation with ASP.NET Core.
As well as being used in MVC, they can also be used with ASP.NET Core Web API.
After taking a look at the some of the default Data Annotation validators in .NET, we'll look at how to code a custom one in C# and how to add it to a property in a model.
Default Data Annotation validators
Data Annotation validators are contained in the System.ComponentModel.DataAnnotations assembly, and they provide attribute classes that can be used for validating a model property.
Some of the examples include:
Required- Ensures that the property has a value assigned to itEmailAddress- Validates the format of an email addressRegularExpression- Validates the format of a particular value using regular expressionMinLength- The minimum length of a valueMaxLength- The maximum length of a value
There is a full list of Data Annotation validators on the Microsoft website.
How to use Data Annotation validators
When creating an action in a controller, a model can be used as a parameter. This model contains all the properties for data fields that will be passed into the action's request.
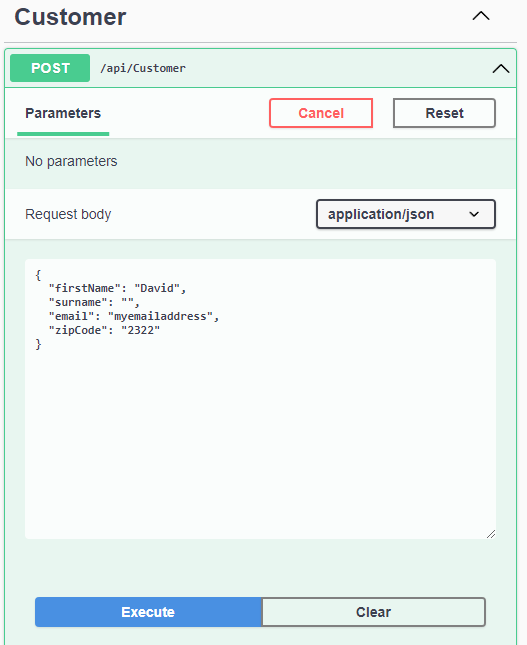
In this example, a customer controller has been set up with a Create endpoint. Within that, an instance the CustomerModel type has been passed in as a parameter.
// CustomerController.cs
[ApiController]
[Route("api/[controller]")]
public class CustomerController : ControllerBase
{
	[HttpPost]
	public IActionResult Create(CustomerModel customerModel)
	{
		return Ok(customerModel);
	}
}
The CustomerModel class has a number of properties that represent data fields for the customer.
Each of these properties have Data Annotation validators assigned to them. For reference, more than one Data Attribute can be assigned to a property in the model. They all must pass for the property to successfully validate.
public class CustomerModel
{
	[Required, MinLength(3), MaxLength(30)]
	public string? FirstName { get; init; }

	[Required, MinLength(3), MaxLength(50)]
	public string? Surname { get; init; }

	[EmailAddress]
	public string? Email { get; init; }

	[RegularExpression("^([0-9]{5})$")]
	public string? ZipCode { get; init; }
}
In the above example, the following must all be met for the model to validate:
- First name - Is required, and has a length of between 3 and 30 characters
- Surname - Is required, and has a length of between 3 and 50 characters
- Email - Must be a valid email address
- Zip code - Must match the regular expression which states that it has to have five numbers as it's value
When running the ASP.NET Core Web API and calling this endpoint, if some of the properties have not been validated against their data annotation attributes, the Web API returns a 400 response and lists all the different errors as part of it.
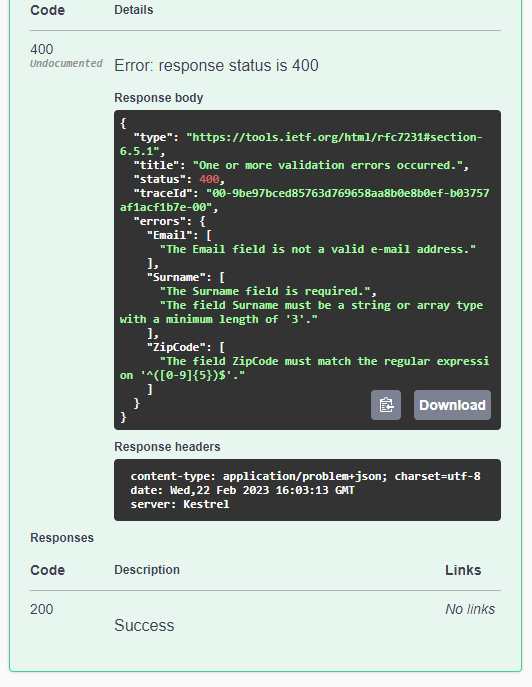
It's only when all the properties are successfully validated does the Web API return with a valid response.
Creating a custom validator
In-addition to the validators contained in the System.ComponentModel.DataAnnotations assembly, custom Data Annotation validators can be created. This is great for more complex validation methods which are not contained in the .NET library.
To create one, a new class has to be created that inherits the ValidationAttribute abstract class. Within that, the IsValid method can be overridden.
The IsValid method has two overrides. Both of them pass in a nullable object as a value. This represents the value of the property that is being validated.
One of the overrides has a second parameter, which is a ValidationContext type. This allows for getting the full object instance so if values need to be compared with different properties in the model. This also returns a ValidationResult type which allows for a custom error message to be returned.
// ValidationAttribute.cs
public virtual bool IsValid(object? value) {
	...
}

protected virtual ValidationResult? IsValid(object? value, ValidationContext validationContext) {
	...
}
Within that, the validation can be performed.
For our custom validation, the rule is to validate whether the customer is 18 years old or old. If they are under 18, the validation throws an error.
The first is to convert the value from an object to a string. If the string is empty, it can be returned as successful because the Required attribute can handle this.
Afterwards, the string needs to be converted into a DateTime type. If it can't be, an error message is displayed.
It then works out the minimum date for the date of birth and compares it to the date of birth inputted. If the inputted date of birth is greater than the minimum one, it throws an error. Otherwise, a successful response is returned.
// CustomerDateOfBirthValidation.cs
public class CustomerDateOfBirthValidation : ValidationAttribute
{
	public const string MINIMUM_DATE_OF_BIRTH = "The customer is younger than 18 years old";

	/// <summary>
	/// Minimum age
	/// </summary>
	private int minAge = 18;

	/// <summary>
	/// Whether the date of birth is valid.
	/// </summary>
	/// <param name="value"></param>
	/// <returns></returns>
	protected override ValidationResult? IsValid(object? value, ValidationContext validationContext)
	{
		var valueString = value != null ? value.ToString() : null;

		if (string.IsNullOrWhiteSpace(valueString))
		{
			// No value, so return success.
			return ValidationResult.Success;
		}

		// Convert to date time.
		if (!DateTime.TryParse(valueString, out DateTime dob))
		{
			// Not a valid date, so return error.
			return new ValidationResult("Unable to convert the date of birth to a valid date");
		}

		// Minimum date of birth
		var minDateOfBirth = DateTime.Now.Date.AddYears(minAge * -1);

		if (dob > minDateOfBirth)
		{
			// Under minimum date of birth, so return error.
			return new ValidationResult(MINIMUM_DATE_OF_BIRTH);
		}

		// Return success
		return ValidationResult.Success;
	}
}
This can be applied to a property in the CustomerModel like this:
public class CustomerModel
{
	...

	[DataType(DataType.Date), Required, CustomerDateOfBirthValidation]
	public DateTime? DateOfBirth { get; init; }
}
More information
Watch our video where we talk through Data Annotation validators in more depth, and show how they can work in an ASP.NET Core Web API.
In-addition, the code example that is used in this example can be downloaded.
Using it in MVC is much the same
This example shows how to use Data Annotation validators in an ASP.NET Core Web API, but it's much the same when using MVC. A model is created, and Data Annotation validators can be assigned to each property.
However, the behaviour of a validation result needs to be explictly set. When using the ApiController attribute in a controller, if a model does not meet the validation, it returns a 400 response with a list of all the errors. This would normally be used in an ASP.NET Core Web API.
But when this is not present, the action will run as normal. Fortunately, a ModelState instance can be called inside an action, and within that, there is an IsValid property. If this is set to false, the model has failed validation.
With this in mind, different responses can be returned on whether a validation has successfully passed or not.
Related pages
