How to use the button onclick event in Blazor WebAssembly
Published: Friday 9 July 2021
Using the button click event in Blazor WebAssembly is extremely important for sending data amongst other things.
Using a Blazor WebAssembly 'notes' example
We have built a simple Blazor WebAssembly 'notes' application to demonstrate our examples.
Note model. The Note model is responsible for storing the actual note and the date/time it was created.
// Note.cs
public class Note
{
	public string Message { get; }

	public DateTimeOffset Created { get; }

	public Note(string message)
	{
		Message = message;
		Created = DateTimeOffset.UtcNow;
	}
}
From there, we have two Razor components. The first is NoteViewComponent.razor, and it displays the actual note. A Note type is passed in as a Razor component parameter to indicate which note it is referencing.
<!-- NoteViewComponent.razor -->
@if (Note != null)
{
	<li>
		<span>@Note.Message</span>
		<span>Created: @Note.Created.ToUniversalTime().ToString("ddd d MMM yyyy HH:mm:ss")</span>
	</li>
}
@code {
	[Parameter]
	public Note Note { get; set; }
}
The other is NoteListingComponent.razor. This displays all the notes by using the NoteViewComponent Razor component, and shows a form that allows the user to create a new note.
OnInitializedAsync method in Blazor, we go ahead and initialise our notes list property.
<!-- NoteListingComponent.razor -->
@page "/"
<div class="col-6">
	<h2>Enter your note</h2>
	<fieldset>
		<label for="Comment">
			<textarea id="Comment" cols="50" rows="6"></textarea>
		</label>
	</fieldset>
	<button type="submit">Submit</button>
</div>
<div class="col-6">
	<h2>Your saved notes</h2>
	@if (Notes?.Any() ?? false)
	{
		<ul>
			@foreach (var note in Notes)
			{
				<NoteViewComponent Note="@note"></NoteViewComponent>
			}
		</ul>
	}
	else
	{
		<p>You currently do not have any saved notes.</p>
	}
</div>
@code {

	public IList<Note> Notes { get; set; }

	protected override async Task OnInitializedAsync()
	{
		Notes = new List<Note>();

		await base.OnInitializedAsync();
	}
}
This Blazor code example can be downloaded to experiment with the things we have mentioned mention in this article.
Adding a button onclick event
We start with adding a button click event, and for this, we are going to use a textarea to bind a value to a property.
NewComment property. This will store the textarea value.
<!-- NoteListingComponent.razor -->
@page "/"
...
@code {
	...
	public string NewComment { get; set; }
	...
}
We then need to bind our NewComment property to the textarea value. We do that by using the @bind attribute. In addition, we need to set a bind event. This is so we know what bind event is triggered when setting our property.
<!-- NoteListingComponent.razor -->
@page "/"
<div class="col-6">
	<h2>Enter your note</h2>
	<fieldset>
		<label for="Comment">
			<textarea id="Comment" cols="50" rows="6" @bind="NewComment" @bind:event="onchange"></textarea>
		</label>
	</fieldset>
	<button type="submit">Submit</button>
</div>
...
@code {
...
}
Next, we need to create a submit call method. This will create a new Note instance and add it to our Notes list instance. In addition, it will empty our NewComment property. This will ensure that when we create a note, it will empty the textarea value.
<!-- NoteListingComponent.razor -->
@using RoundTheCode.BlazorOnClick.Models
@page "/"
...
@code {

	public IList<Note> Notes { get; set; }

	...

	protected void OnSubmitNote(MouseEventArgs mouseEventArgs)
	{
		Notes.Add(new Note(NewComment));
		NewComment = string.Empty;
	}

	...
}
Finally, we need to bind our OnSubmitNote call method to the submit button. This happens by adding an @onclick attribute, and passing in the OnSubmitNote method as it's value.
<!-- NoteListingComponent.razor -->
@page "/"
<div class="col-6">
	...
	<button type="submit" @onclick="@OnSubmitNote">Submit</button>
</div>
...
@code {
...
}
And that's it. We can now create notes in our application.
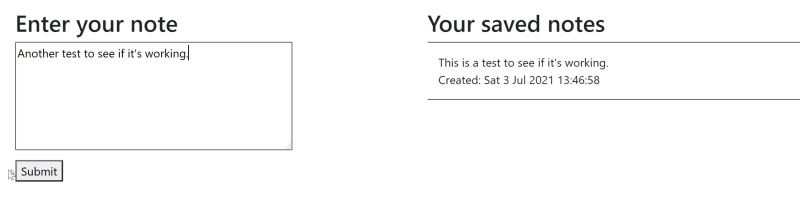
Creating a note in a Blazor WebAssembly application
Using a button onclick event as a parameter
Our next task is to use a button onclick event as a parameter, and we will demonstrate this to delete a note.
NoteViewComponent Razor component. The issue with this is that we need to delete the Note instance from our Note list instance in our NoteListingComponent Razor component when the button is clicked.
NoteViewComponent Razor component, and apply the [Parameter] attribute to it. This property will return an EventCallback type that allows us to set the call method in another Razor component.
<!-- NoteViewComponent.razor -->
...
@code {
	...
	[Parameter]
	public EventCallback<MouseEventArgs> OnDeleteNote { get; set; }
}
Our next job is to create the delete button. We will bind our OnDeleteNote event callback as the onclick event.
<!-- NoteViewComponent.razor -->
@if (Note != null)
{
	<li>
		<span>@Note.Message</span>
		<span>Created: @Note.Created.ToUniversalTime().ToString("ddd d MMM yyyy HH:mm:ss")</span>
		<button type="submit" @onclick="@OnDeleteNote">Delete</button>
	</li>
}
@code {
...
}
We now have to set up the call event for deleting the note and we can do that by going back to our NoteViewComponent Razor component.
OnDeleteNote call method. This will pass in the Note instance that we wish to delete, and removes it from our notes listing.
<!-- NoteListingComponent.razor -->
@page "/"
...
@code {

	...

	protected void OnDeleteNote(MouseEventArgs mouseEventArgs, Note note)
	{
		if (Notes?.Any(n => n == note) ?? false)
		{
			Notes.Remove(Notes.First(n => n == note));
		}
	}
}
The final thing we need to do is to bind our OnDeleteNote event callback in NoteListingComponent into our NoteViewComponent reference. We can use the onclick pass parameter, as the event callback was declared as a parameter, and it returns an EventCallback type.
Note reference as well as the event arguments.
<!-- NoteListingComponent.razor -->
...
<div class="col-6">
	<h2>Your saved notes</h2>
	@if (Notes?.Any() ?? false)
	{
		<ul>
			@foreach (var note in Notes)
			{
				<NoteViewComponent Note="@note" OnDeleteNote="@((e) => OnDeleteNote(e, note))"></NoteViewComponent>
			}
		</ul>
	}
	else
	{
		<p>You currently do not have any saved notes.</p>
	}
</div>
@code {
	...
}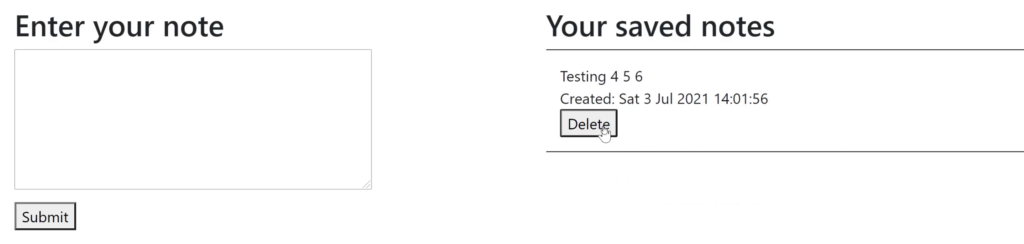
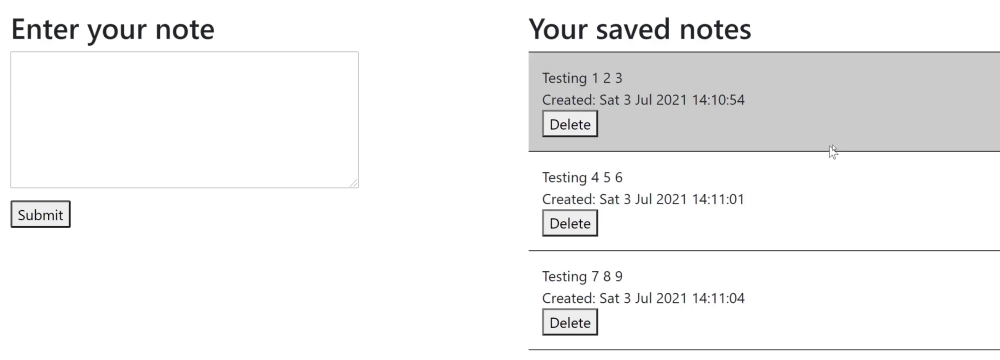
Deleting a note in a Blazor WebAssembly application using onclick
Using other HTML events
It's not just the click event that we can apply a callback event. We can do for other events as well.
NoteViewComponent Razor component, we will apply an <li> class to the existing tag. This will change when the mouse is hovered over, and will change back when it's hovered out.
ClassName string property.
<!-- NoteViewComponent.razor -->
@if (Note != null)
{
	<li>
		<span>@Note.Message</span>
		<span>Created: @Note.Created.ToUniversalTime().ToString("ddd d MMM yyyy HH:mm:ss")</span>
		<button type="submit" @onclick="@OnDeleteNote">Delete</button>
	</li>
}
@code {
	public string ClassName { get; set; }
	...
}
Next, we need to set our ClassName property to the <li> class attribute.
<!-- NoteViewComponent.razor -->
@using RoundTheCode.BlazorOnClick.Models
@if (Note != null)
{
<li class="@ClassName">
	<span>@Note.Message</span>
	<span>Created: @Note.Created.ToUniversalTime().ToString("ddd d MMM yyyy HH:mm:ss")</span>
	<button type="submit" @onclick="@OnDeleteNote">Delete</button>
</li>
}
@code {
...
}
This class name will change to highlight when the mouse is hovered over, and will empty once the mouse is hovered out.
highlight class will be set to a grey background colour.
/* NoteViewComponent.razor.css */
.highlight {
	background-color: #ccc;
}
Now we can go about and set up our onmouseover and onmouseout call methods. This will change the class name value.
<!-- NoteViewComponent.razor -->
...
@code {

	...

	protected void OnMouseOver(MouseEventArgs focusEventArgs)
	{
		ClassName = "highlight";
	}

	protected void OnMouseOut(MouseEventArgs focusEventArgs)
	{
		ClassName = string.Empty;
	}

}
Finally, we can bind our callback events to the OnMouseOver and OnMouseOut attributes in our <li> tag.
<!-- NoteViewComponent.razor -->
@if (Note != null)
{
	<li class="@ClassName" @onmouseover="@OnMouseOver" @onmouseout="@OnMouseOut">
		...
	</li>
}
@code {

	...
}
Change the background colour in Blazor WebAssembly using onmouseover and onmouseout.
Asynchronous event calls
We are now going to look at how to set up a button onclick async call method, very important when making API calls.
await keyword. In-addition, the call method returns a Task type.
System.Diagnostics namespace, and add a new Stopwatch instance to our OnSubmitNote method. When we start the stopwatch, it will enter a while loop, and will continue to loop until two seconds has elapsed.
<!-- NoteListingComponent.razor -->
@using System.Diagnostics
@page "/"
...
@code {

	...
	protected void OnSubmitNote(MouseEventArgs mouseEventArgs)
	{
		var stopwatch = new Stopwatch();
		stopwatch.Start();

		while (stopwatch.Elapsed.TotalSeconds < 2)
		{

		}

		Notes.Add(new Note(NewComment));
		NewComment = string.Empty;
	}

	...
}
What happens is during that two second delay, it will slow the application. We try and hover over a note, which should change the background colour. However, that doesn't happen until our OnSubmitMethod call method has finished executing.
Task.Delay method rather than using a Stopwatch instance, using the await keyword.
<!-- NoteListingComponent.razor -->
<div class="col-6">
	...
	<button type="submit" @onclick="@(async(e) => await OnSubmitNoteAsync(e))">Submit</button>
</div>
...
@code {

	...

	protected async Task OnSubmitNoteAsync(MouseEventArgs mouseEventArgs)
	{
		await Task.Delay(new TimeSpan(0, 0, 2));

		Notes.Add(new Note(NewComment));
		NewComment = string.Empty;
	}

	...
}
This now fixes the issue. Whilst the two second delay is imposed, we can still do other activities on our Blazor application, such as hovering over our note, which results in changing the background colour.
Watch the video
You can watch us implement the demonstrations in this article in the following video.
Related tutorials