
Create a small blog in Blazor - Part 1 - Create application in Visual Studio
Published: Thursday 21 May 2020
File Downloads
Welcome to a new series where we go and create a small blog in Blazor. In this first edition, we are going to go ahead and create the Blazor application in Visual Studio. Afterwards, we will go through and examine what files have been created for us and what is the purpose of them.
Tools You Will Need
Before we go ahead and create our application, we need to run through some of the tools you will need if you are to follow along at home. You will need:
- SQL Server 2017+
- Visual Studio Professional 16.4.3+
- .NET Core SDK 3.1.3
- Experience in .NET Core
You may be able to use a higher .NET Core SDK version, but be aware that things work in different ways with different versions. Experience in .NET Core is recommended as we will be talking through some of the configuration changes.
Create an Application
Create a new project in Visual Studio. Select Blazor App. Give it a name. In our instance, we called it RoundTheCode.Blazor. Then you will have a choice as to whether you use Blazor Server or Blazor WebAssembly.
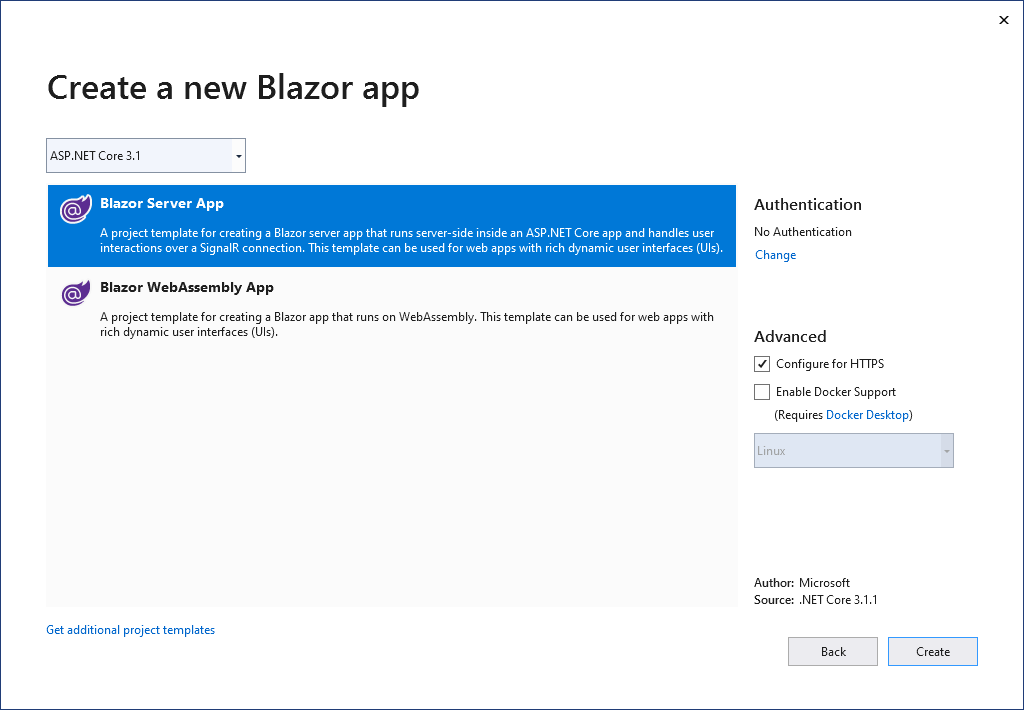
You may find that Blazor WebAssembly doesn't appear for you. You may find you have to download additional templates for it to show. But, in our instance we are going to select Blazor Server App. This will then create our application. Once that's done we can examine the files.
Examining The Files
Visual Studio has created an ASP.NET Core application with Blazor already configured. That's examine some of the files and see what appears.
Startup Class
The Startup class has a number of configuration changes in the ConfigureServices method.
// Startup.cs
public void ConfigureServices(IServiceCollection services)
{
	services.AddRazorPages();
	services.AddServerSideBlazor();
}
As Blazor uses Razor components, it's added that. It's also added a configuration to integrate server-side Blazor.
// Startup.cs
app.UseEndpoints(endpoints =>
{
	endpoints.MapBlazorHub();
	endpoints.MapFallbackToPage("/_Host");
});
You can find the _Host.cshtml file in the Pages folder of your application. Next we will examine that.
_Host Razor View
The _Host razor view has your HTML layout. It has your standard <html>, <head> and <body> tags. Embedded in the <body> tag is this line:
<!-- Host.cshtml -->
<component type="typeof(App)" render-mode="ServerPrerendered" />
What this does is it tells the application to bootstrap to our App class. So anything rendered from that class will appear where the bootstrap takes place.
App Razor Component
When you create a Razor component, the name of the file tends to be the same as the class name. So App.razor has a class name of App. So that's how the application knows to bootstrap to App.razor. Inside App.razor, you will find the following:
<!-- App.razor -->
<Router AppAssembly="@typeof(Program).Assembly">
	<Found Context="routeData">
		<RouteView RouteData="@routeData" DefaultLayout="@typeof(MainLayout)" />
	</Found>
	<NotFound>
		<LayoutView Layout="@typeof(MainLayout)">
			<p>Sorry, there's nothing at this address.</p>
		</LayoutView>
	</NotFound>
</Router>
This uses the Router component and it uses the URL to see if it can find a matching endpoint. If it can, it goes through the Found component. If it can't, it goes through the NotFound component, display a "Sorry, there's nothing at this address" message.
MainLayout Razor Component
This references a "NavMenu" Razor component, which we will examine next. Before that, we can see that there is an @Body reference. What this does is that it renders the content, depending on what endpoint has been called to the application.
<!-- MainLayout.razor -->
@inherits LayoutComponentBase

<div class="sidebar">
	<NavMenu />
</div>

<div class="main">
	<div class="top-row px-4">
		<a href="https://docs.microsoft.com/aspnet/" target="_blank">About</a>
	</div>

	<div class="content px-4">
		@Body
	</div>
</div>
NavMenu Razor Component
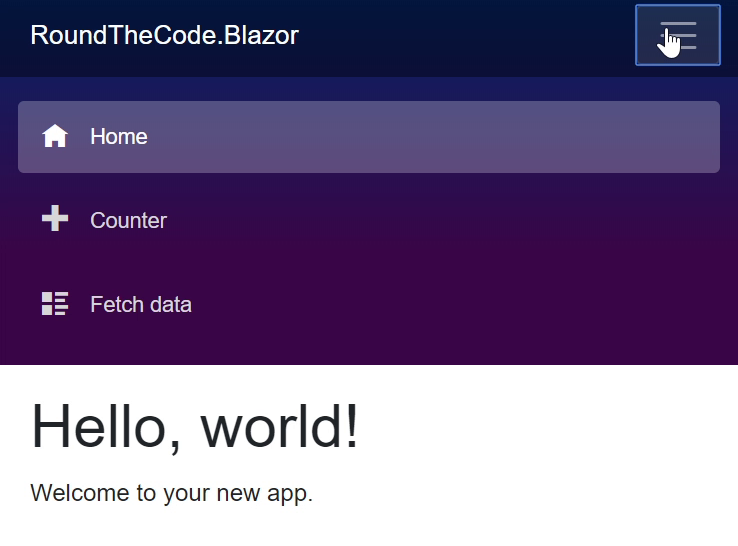
This displays links to other parts of our application on the left hand side of the page. This displays three links:
- Home page link
- Counter demo
- Fetch data demo
In addition to that, we have our first HTML event attribute. When viewing the application on a mobile, we have the option to make this menu appear or disappear.
<!-- NavMenu.razor -->
<div class="top-row pl-4 navbar navbar-dark">
	<a class="navbar-brand" href="">BlazorApp4</a>
	<button class="navbar-toggler" @onclick="ToggleNavMenu">
		<span class="navbar-toggler-icon"></span>
	</button>
</div>

<div class="@NavMenuCssClass" @onclick="ToggleNavMenu">
	<ul class="nav flex-column">
		<li class="nav-item px-3">
			<NavLink class="nav-link" href="" Match="NavLinkMatch.All">
				<span class="oi oi-home" aria-hidden="true"></span> Home
			</NavLink>
		</li>
		<li class="nav-item px-3">
			<NavLink class="nav-link" href="counter">
				<span class="oi oi-plus" aria-hidden="true"></span> Counter
			</NavLink>
		</li>
		<li class="nav-item px-3">
			<NavLink class="nav-link" href="fetchdata">
				<span class="oi oi-list-rich" aria-hidden="true"></span> Fetch data
			</NavLink>
		</li>
	</ul>
</div>

@code {
	private bool collapseNavMenu = true;

	private string NavMenuCssClass => collapseNavMenu ? "collapse" : null;

	private void ToggleNavMenu()
	{
		collapseNavMenu = !collapseNavMenu;
	}
}
What this Razor component does is that it declares two properties. The first is "collapseNavMenu" which is set to true. The other is "NavMenuCssClass". What this does is that it looks at the "collapseNavMenu" value. If it's set to true, the "NavMenuCssClass" is set to collapse, otherwise it's set to null. The "NavMenuCssClass" is used as a div class, so when it's set to "collapse", it disappears.
Lastly, we will look at the three demo components that have been created for us.
Index Razor Component
There's not much to this. One thing to look out for is the @page keyword. What this does is that it dictates when this Razor component is rendered. So in this instance, it's rendered when "/" is called in our application.
<!-- Index.razor -->
@page "/"

<h1>Hello, world!</h1>

Welcome to your new app.
Counter Razor Component
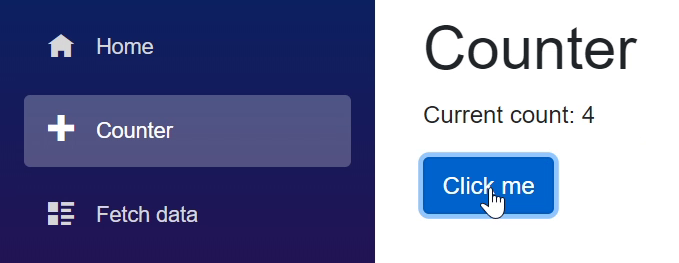
This one does a little bit more. Firstly, looking at our @page keyword, it renders when "/counter" is called. On here we have a button and a counter. When the button is pressed, the counter is incremented by 1.
<!-- Counter.razor -->
@page "/counter"

<h1>Counter</h1>

<p>Current count: @currentCount</p>

<button class="btn btn-primary" @onclick="IncrementCount">Click me</button>

@code {
	private int currentCount = 0;

	private void IncrementCount()
	{
		currentCount++;
	}
}
In our @code section, we have a "currentCount" property that is set to 0. In addition, we have a "IncrementCount" method. When called, it increases the "currentCount" property by 1.
FetchData Razor Component
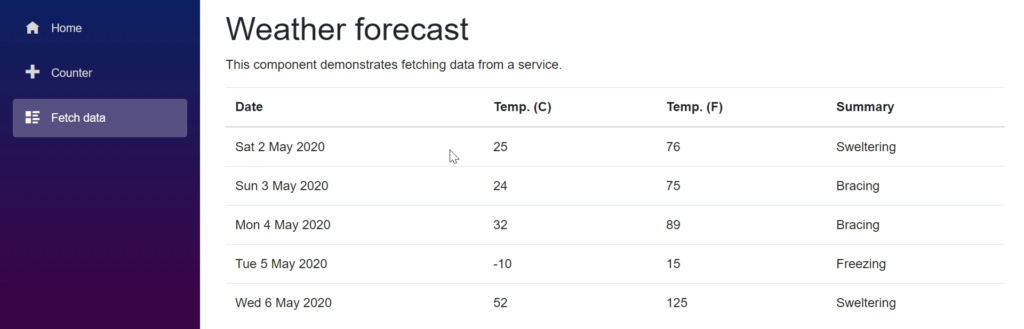
Our final example is where we inject a service into our Razor component. In this example, it injects an instance of "WeatherForecastService" so it can get the weather for the next five days.
<!-- FetchData.razor -->
@page "/fetchdata"

@using BlazorApp4.Data
@inject WeatherForecastService ForecastService

<h1>Weather forecast</h1>

<p>This component demonstrates fetching data from a service.</p>

@if (forecasts == null)
{
	<p><em>Loading...</em></p>
}
else
{
	<table class="table">
		<thead>
			<tr>
				<th>Date</th>
				<th>Temp. (C)</th>
				<th>Temp. (F)</th>
				<th>Summary</th>
			</tr>
		</thead>
		<tbody>
			@foreach (var forecast in forecasts)
			{
				<tr>
					<td>@forecast.Date.ToShortDateString()</td>
					<td>@forecast.TemperatureC</td>
					<td>@forecast.TemperatureF</td>
					<td>@forecast.Summary</td>
				</tr>
			}
		</tbody>
	</table>
}

@code {
	private WeatherForecast[] forecasts;

	protected override async Task OnInitializedAsync()
	{
		forecasts = await ForecastService.GetForecastAsync(DateTime.Now);
	}
}
In addition, we also override the "OnInitializedAsync" method. We populate the "forecasts" property with the weather forecast for the next five days. To do this, we use our instance of "WeatherForecastService" and call the "GetForecastAsync" method, passing in today's date.
Running the Application
The video below shows the Blazor application running. It demonstrates each of the demos and how Blazor interacts with them.
Next Steps
When creating our small blog, we don't need these demo applications. So we go ahead and delete the Index, Counter and FetchData Razor components. In addition, we remove the links from our navigation menu and remove the "WeatherForecastService" class. We also need to remove the reference to "WeatherForecastService" from our Startup class.
Related tutorials

Create a small blog in Blazor - Part 2 - Entity Framework integration
We set up our entities and DbContext to integrate Entity Framework into our Blazor Server app. We also create the SQL Server database required.
Create a small blog in Blazor - Part 3 - Build Entity Framework queries
We create services, with methods that contain Entity Framework queries for our blog before adding the services to Dependency Injection.