

How to install an ASP.NET Core .NET 5 app on Ubuntu 20.04
Published: Monday 7 December 2020
We will demonstrate how to install an ASP.NET Core in .NET 5 application on Ubuntu 20.04.
Sign Up For Hosting
We are picking A2 Hosting to purchase our VPS for web hosting.
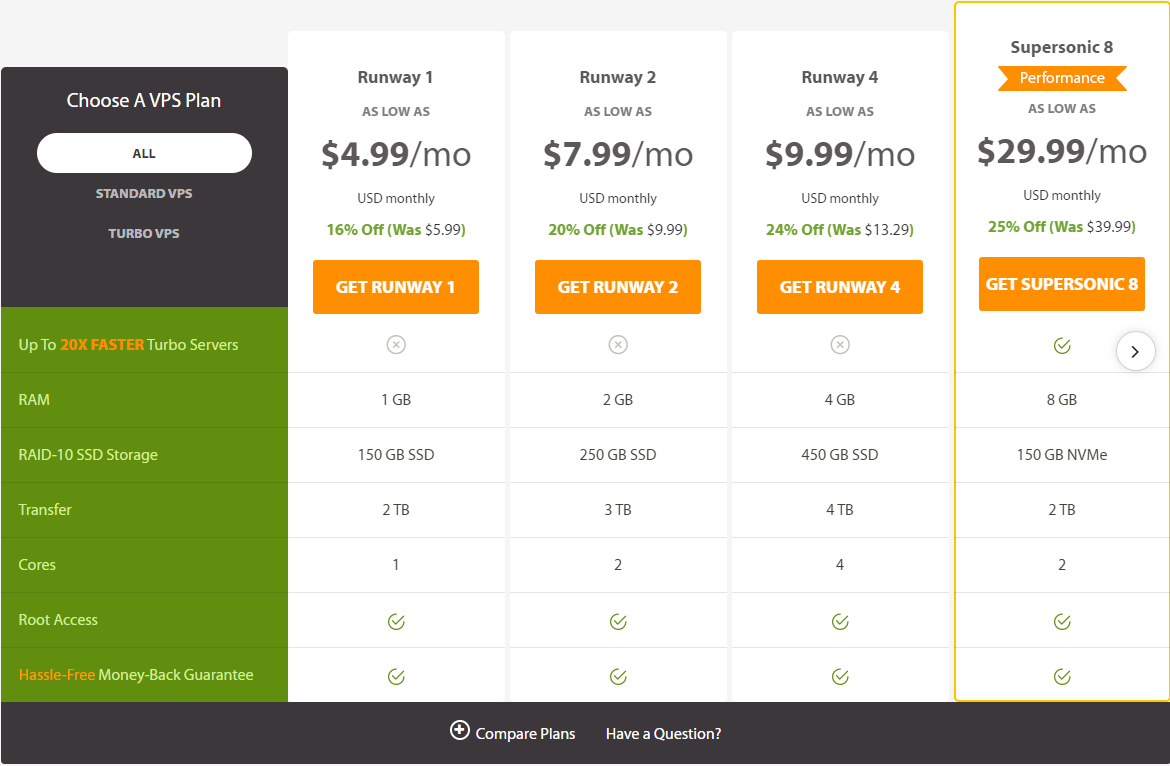
A2 Hosting Unmetered VPS Prices. Prices correct on 29th November 2020.
As we have a very small ASP.NET Core Web API to deploy, we are going to use the Runaway 1 plan.
Configure The VPS
When configuring the VPS, we are given a control panel from A2 Hosting.
- Server information
- Customise your hosting
- Additional information such as SSH details
In addition, it tells us what operating system is installed. From there, we can control whether we want to stop or start the VPS, restart the VPS, or turn it off.
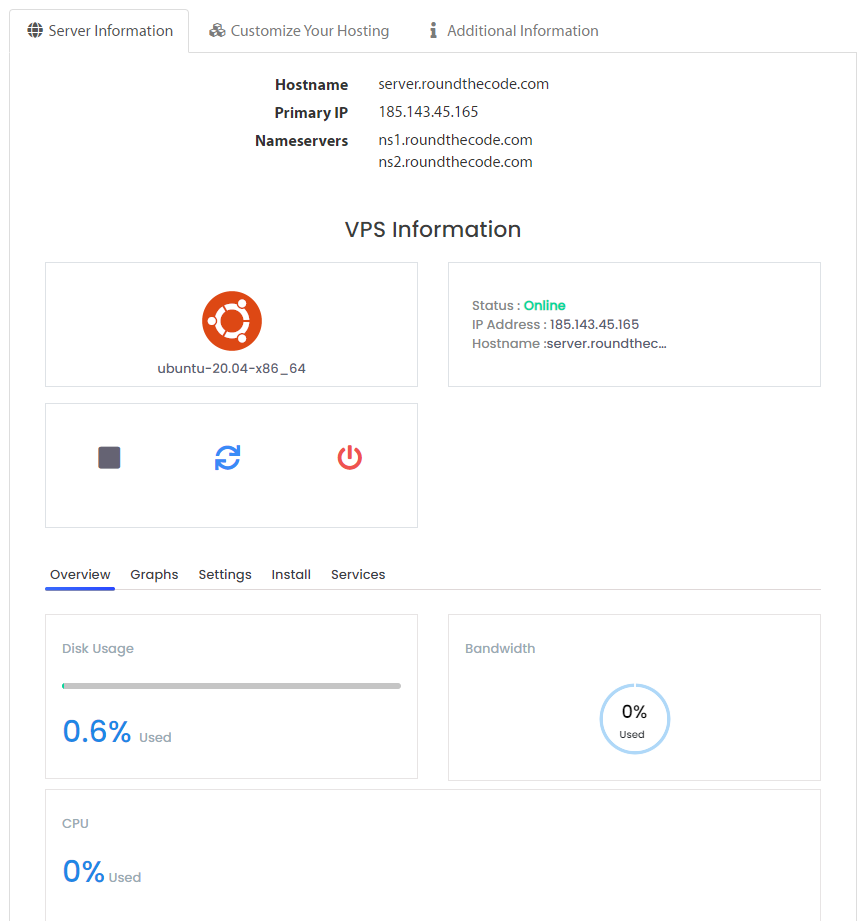
VPS Server Information on the A2 Hosting Control Panel
Add an A Record To Our Domain Name
The next step is to add an A record to our domain name. The A record will point to the VPS's IP address.
Publish Our ASP.NET Core Web API
We have a very simple ASP.NET Core Web API application that we need to publish to our VPS. The ASP.NET Core Web API does not link up with a database.
public class Startup
{
	...

	// This method gets called by the runtime. Use this method to configure the HTTP request pipeline.
	public void Configure(IApplicationBuilder app, IWebHostEnvironment env)
	{
		...

		app.UseForwardedHeaders(new ForwardedHeadersOptions
		{
			ForwardedHeaders = ForwardedHeaders.XForwardedFor | ForwardedHeaders.XForwardedProto
		});

		...
	}
}
From there, we can then publish our ASP.NET Core Web API.
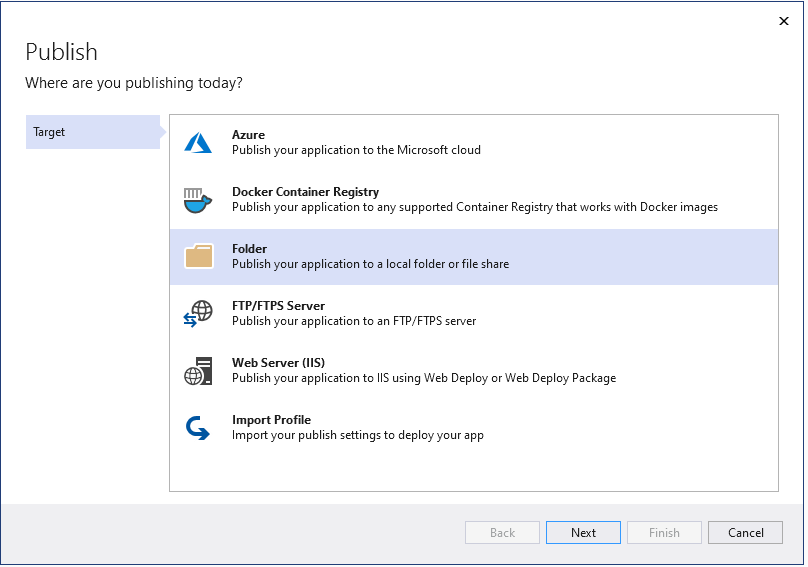
Publish an ASP.NET Core in .NET 5 app to a Folder in Visual Studio 2019
Go through the steps and that will publish the application to the delegated folder.
Connect To VPS
We will be using SSH to connect to the VPS.
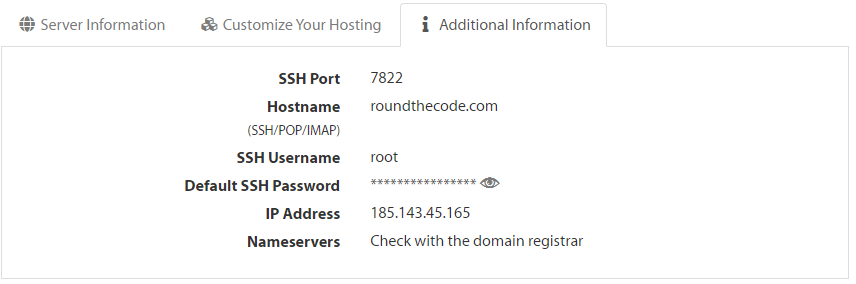
SSH Information on A2 Hosting Unmetered VPS
Now that we have the SSH details, we need to connect to our VPS through SSH.
ssh {username}@{domain} -p {portnumber}So in my instance, the placeholders would be replaced with the following:
ssh root@dotnet.roundthecode.com -p 7822From there, it will ask for the password.
Add a New User
We want to create a new user. The whole point of this is so we can use this user to connect to our VPS via SFTP, and upload the published files from our ASP.NET Core Web API.
sudo adduser roundthecodeWe are prompted to give this user a password and confirm it. All other options can be left blank.
Install Software
There is some software we need to install.
sudo apt install nanoNext, we need to install Apache.
sudo apt install Apache2From there, we need to install a number of Apache mods.
sudo a2enmod rewrite
sudo a2enmod proxy
sudo a2enmod proxy_http
sudo a2enmod headers
sudo a2enmod ssl
The final thing we need to do with Apache is set to set up a configuration file to run our application.
sudo nano /etc/apache2/sites-enabled/api.confThen add the following contents to api.conf:
<VirtualHost *:*>
	RequestHeader set "X-Forwarded-Proto" expr=%{REQUEST_SCHEME}
</VirtualHost>

<VirtualHost {domain}:80>
	ProxyPreserveHost On
	ProxyPass / http://127.0.0.1:5000/
	ProxyPassReverse / http://127.0.0.1:5000/
	ServerName {domain}
	ServerAlias {domain}
	ErrorLog ${APACHE_LOG_DIR}api-error.log
	CustomLog ${APACHE_LOG_DIR}api-access.log common
</VirtualHost>
Replace the {domain} placeholder with the domain the application will run on. In my instance, we would replace {domain} with dotnet.roundthecode.com.
sudo systemctl restart apache2Uploading The Application
To upload the application, we are going to use FileZilla.
- Protocol: SFTP
- Host: {domain}
- Port: 7822 (same as SSH port number)
- User: {username}
- Password: {password}
The {domain} placeholder would be replaced with the domain where the VPS is located. In my instance, it would be dotnet.roundthecode.com.
Copy The Application to /var/www and Set Owner
We now need to copy the application to /var/www. To do that, we run the following SSH command:
sudo cp -r /home/roundthecode/api /var/www/Our ASP.NET Core Web API now resides on /var/www/api.
sudo chown -R www-data:www-data /var/www/apiGet The Microsoft Packages for Ubuntu
Ubuntu needs to get a listing of all the packages from Microsoft.
wget https://packages.microsoft.com/config/ubuntu/20.04/packages-microsoft-prod.deb -O packages-microsoft-prod.debsudo dpkg -i packages-microsoft-prod.debFrom there, we need to install apt-transport-https and the ASP.NET Core 5 runtime.
sudo apt-get update
sudo apt-get install -y apt-transport-https
sudo apt-get update
sudo apt-get install -y aspnetcore-runtime-5.0
Add Service
With the ASP.NET Core runtime installed, we can set up our ASP.NET Core Web API application as a service.
sudo nano /etc/systemd/system/api.serviceThen, adding the following contents into that file:
[Unit]
Description=Api

[Service]
WorkingDirectory=/var/www/api/
ExecStart=/usr/bin/dotnet /var/www/api/RoundTheCode.MyApi.dll
Restart=always
# Restart service after 10 seconds if the dotnet service crashes:
RestartSec=10
KillSignal=SIGINT
SyslogIdentifier=api
User=www-data
Environment=ASPNETCORE_ENVIRONMENT=Production

[Install]
WantedBy=multi-user.target
The WorkingDirectory option represents the location as to where our ASP.NET Core Web API is located.
Enable, And Start The Service
With the service configured, we can now enable and run the service.
sudo systemctl enable api.serviceThen it's a minor change to start the service in SSH:
sudo systemctl start api.serviceTo check that it's running fine, we can run this SSH command:
sudo systemctl status api.serviceThis will show that our ASP.NET Core Web API is running on localhost:5000.
Check The Application Is Working
As Apache is set up to proxy the ASP.NET Core Web API on localhost:5000, it should now be running.
Saving Money on Hosting
One of the benefits of running a web application on Linux is that web host costs are normally cheaper.
Latest tutorials

File logging in ASP.NET Core made easy with Serilog
Learn how to add file logging to an ASP.NET Core app using Serilog, including setup, configuration, and writing logs to daily rolling files.