
The simplest way to secure a Minimal API (With Swagger)
As a .NET developer building a Minimal API project, authentication is often the thing that gets forgotten about until the very end.
And if you forget it... you're basically exposing your API to the entire internet.
In this article, we'll walk you through the simplest way to secure your Minimal API endpoints using an API key - and even test them directly in Swagger.
Create the authentication handler
This is the core of the solution. We create a custom authentication handler that validates an API key sent via request headers.
// ApiKeyAuthenticationHandler.cs
public class ApiKeyAuthenticationHandler :
	AuthenticationHandler<AuthenticationSchemeOptions>
{
	private readonly IOptionsMonitor<ApiOptions> _apiOptions;
	public const string SchemeName = "ApiKey";

	public ApiKeyAuthenticationHandler(
		IOptionsMonitor<AuthenticationSchemeOptions> options,
		IOptionsMonitor<ApiOptions> apiOptions,
		ILoggerFactory loggerFactory,
		UrlEncoder urlEncoder
		) : base(options, loggerFactory, urlEncoder)
	{
		_apiOptions = apiOptions;
	}

	protected override Task<AuthenticateResult> HandleAuthenticateAsync()
	{
		if (!Request.Headers.TryGetValue("api-key", out var apiHeaderValue))
		{
			return Task.FromResult(AuthenticateResult.Fail(
				"The API key is missing from the request header"));
		}

		if (apiHeaderValue != _apiOptions.CurrentValue.Key)
		{
			return Task.FromResult(AuthenticateResult.Fail(
				"The API key in the request header doesn't match the config"));
		}

		var identity = new ClaimsIdentity(
			[new Claim(ClaimTypes.AuthenticationMethod, SchemeName)],
			SchemeName
			);

		return Task.FromResult(AuthenticateResult.Success(
			new AuthenticationTicket(
				new ClaimsPrincipal(identity),
				SchemeName
		)));
	}
}
Let's go through each of the steps.
Checking if the API key exists
This checks whether the incoming HTTP request contains an api-key header. If it doesn't, authentication immediately fails. This ensures that every request must explicitly provide a key.
// ApiKeyAuthenticationHandler.cs
if (!Request.Headers.TryGetValue("api-key", out var apiHeaderValue))
{
	return Task.FromResult(AuthenticateResult.Fail(
		"The API key is missing from the request header"));
}
Validating the key
Here, the provided API key is compared against the configured value (typically stored in your app settings). If they don't match, the request is rejected.
// ApiKeyAuthenticationHandler.cs
if (apiHeaderValue != _apiOptions.CurrentValue.Key)
{
	return Task.FromResult(AuthenticateResult.Fail(
		"The API key in the request header doesn't match the config"));
}
Creating an authenticated identity
If the key is valid, we create a ClaimsIdentity. This represents the authenticated user (even though it's just an API key). The claim gives the request a recognised identity within the system.
// ApiKeyAuthenticationHandler.cs
var identity = new ClaimsIdentity(
	[new Claim(ClaimTypes.AuthenticationMethod, SchemeName)],
	SchemeName
);
Returning a successful authentication
After creating an authenticated identity, we mark the authentication as a success. We create a new AuthenticationTicket and ClaimsPrincipal instance, adding in the identity that we just created.
// ApiKeyAuthenticationHandler.cs
return Task.FromResult(AuthenticateResult.Success(
	new AuthenticationTicket(
		new ClaimsPrincipal(identity),
		SchemeName
)));
Add the authorisation
Next, we wire everything up in the service container.
Defining an authorisation policy
This creates a policy called ApiKey. It ensures that:
The
ApiKeyauthentication scheme is usedThe user must be authenticated to access protected endpoints
// ConfigureServices.cs
public static class ConfigureServices
{
	extension (IServiceCollection services)
	{
		public IServiceCollection AddApiKeyAuthorization()
		{
			services.AddAuthorization(options =>
			{
				options.AddPolicy(ApiKeyAuthenticationHandler.SchemeName,
					policy =>
				{
					policy.AddAuthenticationSchemes(
						ApiKeyAuthenticationHandler.SchemeName
						);
					policy.RequireAuthenticatedUser();
				});
			});

			return services;
		}
	}
}
Registering the authentication handler
This tells ASP.NET Core to use your custom ApiKeyAuthenticationHandler whenever the ApiKey scheme is requested.
// ConfigureServices.cs
public static class ConfigureServices
{
	extension (IServiceCollection services)
	{
		public IServiceCollection AddConfigurationOptions()
		{
			services.AddOptions<ApiOptions>()
				.BindConfiguration("Api");

			return services;
		}

		public IServiceCollection AddApiKeyAuthorization()
		{
			...

			services.AddAuthentication()
				.AddScheme<AuthenticationSchemeOptions,
				ApiKeyAuthenticationHandler
				>(
					ApiKeyAuthenticationHandler.SchemeName,
					null
				);

			return services;
		}
	}
}
Registering everything in Program.cs
This line simply adds your custom authentication and authorisation setup into the application's dependency injection container.
// Program.cs
builder.Services.AddApiKeyAuthorization();
Add to Minimal API endpoints
Now we apply security to the endpoints themselves.
Securing individual endpoints
Adding .RequireAuthorization() to an endpoint applies authentication to it. Useful when only certain routes need protection, or when you want more granular control.
// ProductsEndpoints.cs
public static class ProductsEndpoints
{
	extension (WebApplication app)
	{
		public WebApplication MapProductsEndpoints()
		{
			var group = app.MapGroup("/api/products");

			group.MapGet("{id}", GetProduct)
				.RequireAuthorization();

			return app;
		}
	}

	public static GetProductDto GetProduct(int id) =>
	   new GetProductDto(id, "Watch");
}
Securing an entire endpoint group
Adding .RequireAuthorization() to the group ensures that all endpoints within this group require authentication. This is the easiest way to protect multiple endpoints at once.
// ProductsEndpoints.cs
public static class ProductsEndpoints
{
	extension (WebApplication app)
	{
		public WebApplication MapProductsEndpoints()
		{
			var group = app.MapGroup("/api/products")
				.RequireAuthorization();

			group.MapGet("{id}", GetProduct)

			return app;
		}
	}

	public static GetProductDto GetProduct(int id) =>
	   new GetProductDto(id, "Watch");
}
Add a security transformer for Swagger/OpenAPI
If you want to test this in Swagger, you'll need to tell OpenAPI about your API key by adding a security transformer.
// ApiKeySecurityTransformer.cs
public class ApiKeySecurityTransformer
	: IOpenApiDocumentTransformer
{
	private readonly IAuthenticationSchemeProvider
		_authenticationSchemeProvider;

	public ApiKeySecurityTransformer(
		IAuthenticationSchemeProvider authenticationSchemeProvider)
	{
		_authenticationSchemeProvider = authenticationSchemeProvider;
	}

	public async Task TransformAsync(
		OpenApiDocument document,
		OpenApiDocumentTransformerContext context,
		CancellationToken cancellationToken
	)
	{
		var authenticationSchemes = await _authenticationSchemeProvider
			.GetAllSchemesAsync();

		if (authenticationSchemes.Any(s =>
			s.Name == ApiKeyAuthenticationHandler.SchemeName))
		{
			document.Components ??= new OpenApiComponents();
			document.Components.SecuritySchemes ??=
				new Dictionary<string, IOpenApiSecurityScheme>();
			document.Components.SecuritySchemes.TryAdd(
				ApiKeyAuthenticationHandler.SchemeName,
				new OpenApiSecurityScheme
				{
					Type = SecuritySchemeType.ApiKey,
					In = ParameterLocation.Header,
					Name = "api-key",
					Description = "API key"
				}
			);

			document.Security ??= [];
			document.Security.Add(new OpenApiSecurityRequirement
			{
				[new OpenApiSecuritySchemeReference(
					ApiKeyAuthenticationHandler.SchemeName,
					document
					)] = []
			});

		}
	}
}
Let's go through the steps of the security transformer.
Retrieving authentication schemes
This fetches all registered authentication schemes so we can check if the API key scheme exists before modifying the Swagger document.
// ApiKeySecurityTransformer.cs
var authenticationSchemes = await _authenticationSchemeProvider
			.GetAllSchemesAsync();
Defining the API key in Swagger
This adds a security definition to Swagger. It tells the UI that requests must include an api-key header.
// ApiKeySecurityTransformer.cs
document.Components ??= new OpenApiComponents();
document.Components.SecuritySchemes ??=
	new Dictionary<string, IOpenApiSecurityScheme>();
document.Components.SecuritySchemes.TryAdd(
	ApiKeyAuthenticationHandler.SchemeName,
	new OpenApiSecurityScheme
	{
		Type = SecuritySchemeType.ApiKey,
		In = ParameterLocation.Header,
		Name = "api-key",
		Description = "API key"
	}
);
Applying security globally
This enforces the API key requirement across the documented endpoints, enabling the Authorize button in Swagger.
// ApiKeySecurityTransformer.cs
document.Security ??= [];
document.Security.Add(new OpenApiSecurityRequirement
{
	[new OpenApiSecuritySchemeReference(
		ApiKeyAuthenticationHandler.SchemeName,
		document
		)] = []
});
Register the transformer
To see the Authorize button in Swagger, register the transformer in Program.cs:
// Program.cs
builder.Services.AddOpenApi(options =>
{
options.AddDocumentTransformer<ApiKeySecurityTransformer>();
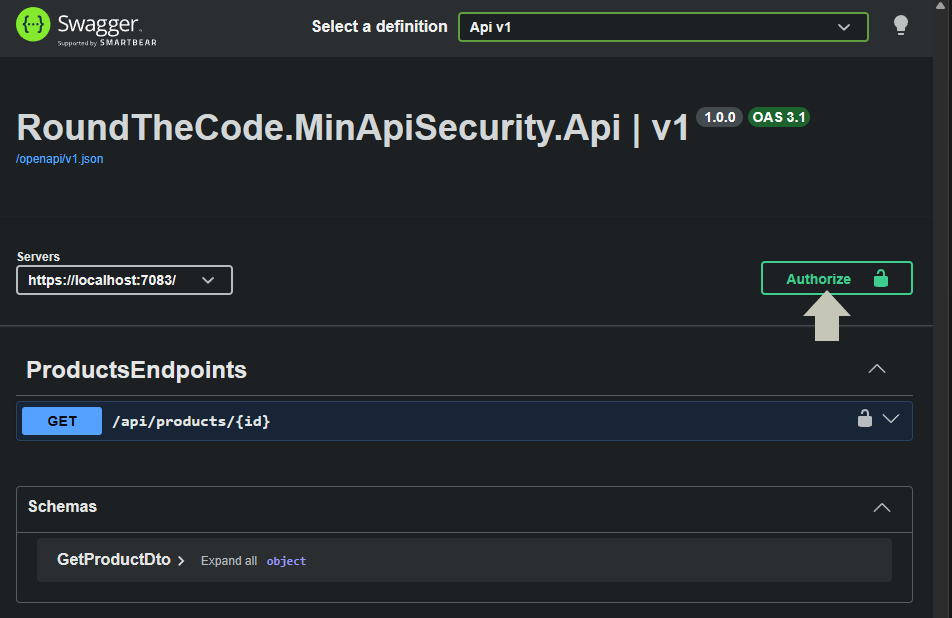
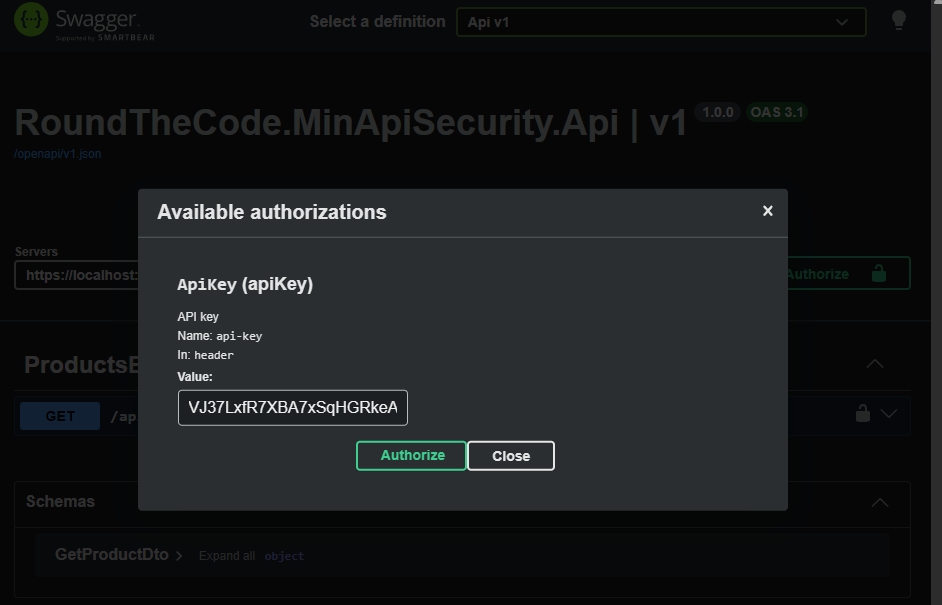
});Run the API. If you have Swagger installed, you will now see the Authorize button where you can input the API key.
Watch the video
Watch this video where we go through the steps to set up authentication in Minimal API endpoints and show you how to add it in Swagger.
Add authentication in a real-world Minimal API
If you want to add authentication in a real-world Minimal API, it's covered in our Minimal API for complete beginners course. As well as adding security, you'll learn how to integrate it with a database, add logging and write unit tests.
This is a must if you want to get ahead of other developers using Minimal APIs.
Related tutorials

