- Home
- .NET tutorials
- Intro to Blazor and creating a Blazor app from scratch
Intro to Blazor and creating a Blazor app from scratch
Published: Monday 3 February 2020
Last month, Microsoft ran a .NET Conf, focusing on Blazor. Now, Blazor has been around since 2018, but to-date, it is still in preview mode. It is a web framework that uses C#, Razor and HTML and allows you to run a Single-Page Application (SPA).
Now, you can run a SPA using the many JavaScript libraries out there such as React, so why change to Blazor? Well, it has the advantage that it can run on client and server side. As documented in one of my previous posts, if you want to use React with .NET Core, you have to create a React app, and then integrate it into your .NET Core application.
Blazor also uses WebAssembly, which is available on four major browser engines according to their website. Their website also states that WebAssembly allows for "deployment on the web for client and server application". What that basically bottles down to is that with Blazor, you can write client-side operations using C#. Previously, you would have had to have known JavaScript, or be knowledgeable in a JavaScript library.
But, JavaScript is still used with Blazor apps. You have to include a JavaScript file for Blazor to establish a communication between your browser and your application. We will come on to that in a bit.
With the intro out the way, that's open up Visual Studio and actually create a Blazor application.
Create a Web Application
Open up Visual Studio 2019 and create a new project. Now, VS 2019 should come with a Blazor template. Do a search for it in the search bar provided.

Now, you can go ahead and click on the Blazor template. VS 2019 will create a sample Blazor app for you that you can go ahead and configure.
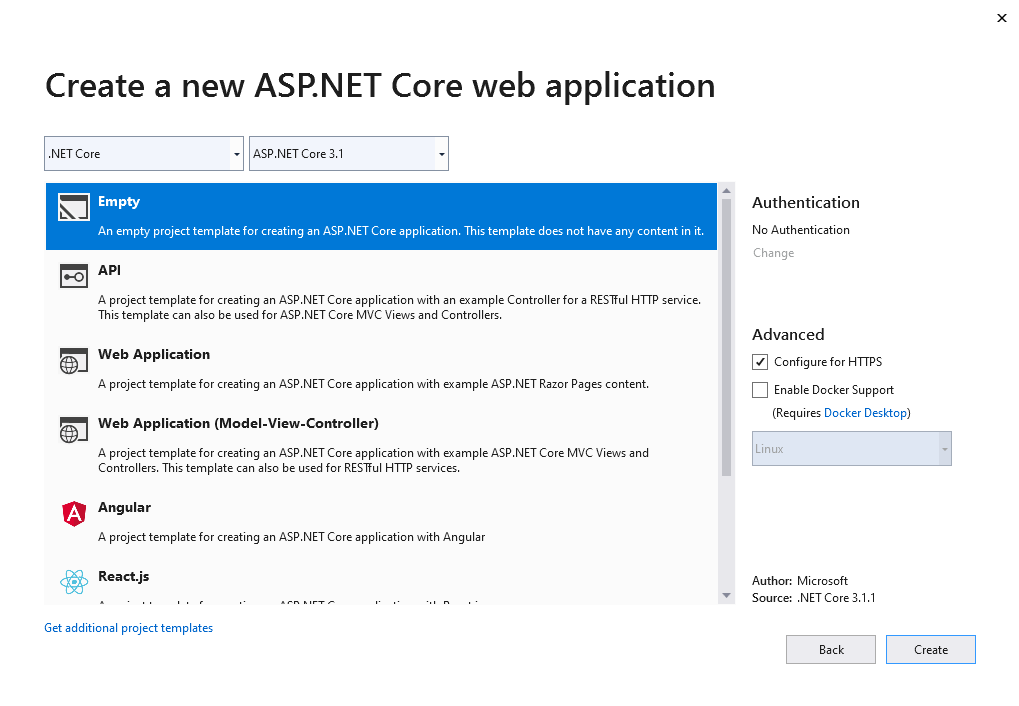
But, I want to go through what configuration is needed and what components are used to make a Blazor app. So I'm going to create an empty ASP.NET Core Web Application project in C#.
I've named my project as RoundTheCode.Blazor, but you can call it what you want. Just a note that everytime RoundTheCode.Blazor is referenced in this article, you will need to substitute it with the name of your project.
Next, choose the file location, and select that you want an empty project template. With RoundTheCode.Blazor, I'm using .NET Core 3.1.1.
Startup Configurations
You will need to make some changes to your Startup.cs file. Now, Blazor uses code from the "Microsoft.AspNetCore.Components" assembly to make it run. As ASP.NET Core web projects use the "Microsoft.NET.Sdk.Web" SDK assembly (you should be able to see this in your .csproj file) to run, the "Microsoft.AspNetCore.Components" assembly should already be included. So no need to go off to Nuget and install these assemblies separately.
I've added a number of configuration lines into my Startup.cs file and I've commented them in the code snippet below:
// Startup.cs
using Microsoft.AspNetCore.Builder;
using Microsoft.AspNetCore.Hosting;
using Microsoft.Extensions.Configuration;
using Microsoft.Extensions.DependencyInjection;
using Microsoft.Extensions.Hosting;

namespace RoundTheCode.Blazor
{
    public class Startup
    {
		public Startup(IConfiguration configuration)
		{
			Configuration = configuration;
		}

		public IConfiguration Configuration { get; }

		public void ConfigureServices(IServiceCollection services)
		{
			services.AddRazorPages(); // Configuration for Blazor
			services.AddServerSideBlazor(); // Configuration for Blazor
		}

		public void Configure(IApplicationBuilder app, IWebHostEnvironment env)
		{
			if (env.IsDevelopment())
			{
				app.UseDeveloperExceptionPage();
			}

			app.UseRouting();
			app.UseStaticFiles();

			app.UseEndpoints(endpoints =>
			{
				endpoints.MapBlazorHub(); // Configuration for Blazor
				endpoints.MapFallbackToPage("/_Host"); // Configuration for Blazor
			});
		}
    }
}
Add RootAssembly to Your .csproj File
It will make your life a lot easier if you add the RootAssembly tag to your .csproj file. In your project, right-click on the project and select "Edit Project File". This will open up your XML .csproj file and you just need to make sure that it contains the RootAssembly tag. The RootAssembly tag will contain the same name as your project name:
<Project Sdk="Microsoft.NET.Sdk.Web">

	<PropertyGroup>
		<TargetFramework>netcoreapp3.1</TargetFramework>
		<RootNamespace>RoundTheCode.Blazor</RootNamespace>
	</PropertyGroup>

</Project>
Create the "Razor" Part of the App
With the configuration out the way, we can now integrate Blazor properly. This is mainly done by creating a number of razor files.
The Layout
The first thing we need to do is to create a layout for our Blazor application.
Create a folder called "Shared" in your Blazor application. Right-click on the "Shared" folder and select "Add..." -> "New Item". You should find that there is an option to create a Razor Component. Call it Layout.razor and press the "Add" button.
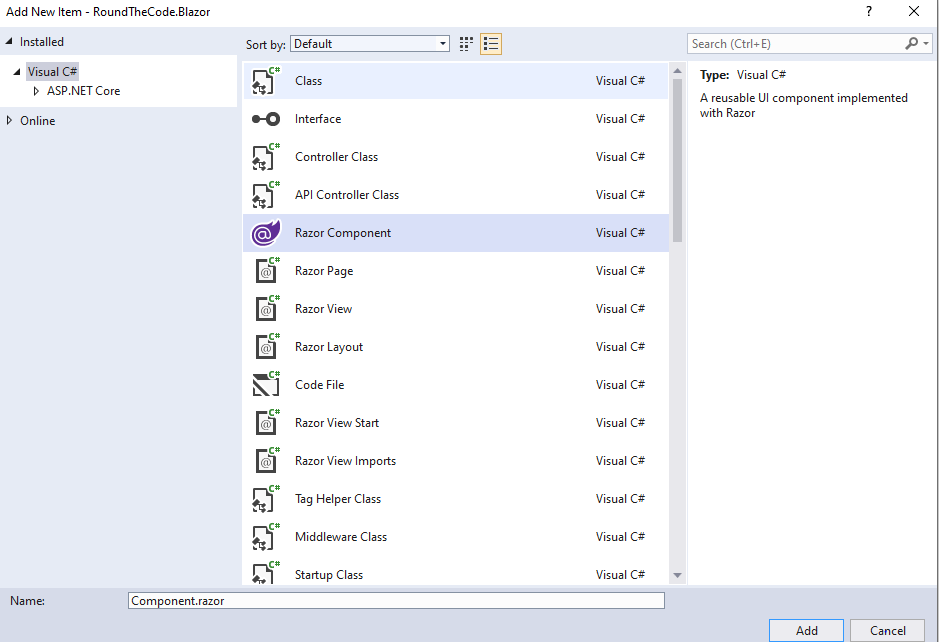
Construct your Layout.razor file with the following code:
<!-- Layout.razor -->
@inherits LayoutComponentBase
<div class="main">
	@Body
</div>
With your layout file, you need to inherit the "LayoutComponentBase" class. This comes from the "Microsoft.AspNetCore.Components" assembly and calling the @Body method will basically render different content depending on which page you are on. It's a bit like the @RenderBody() method used in MVC.
The App
Next, you need to create the app for Blazor. Go into the root of your project and create a Razor component. Call it App.razor.
The "Microsoft.AspNetCore.Components" assembly comes into force again with this file. We need to use the Router class within that and state the assembly that the application is part of. We get the assembly from the Program class.
Inside the Router class, we have to specify a Found and NotFound. The Found class needs to include a reference to our Layout file that we just created. You can see the full code here:
<!-- App.razor -->
@using Microsoft.AspNetCore.Components.Routing
@using RoundTheCode.Blazor.Shared
<Router AppAssembly="@typeof(Program).Assembly">
	<Found Context="routeData">
		<RouteView RouteData="@routeData" DefaultLayout="@typeof(Layout)" />
	</Found>
	<NotFound>Cannot find anything on this page</NotFound>
</Router>
The Pages
Now, we can go ahead and create the pages for our Blazor app. In our Startup.cs file, we've added the following line:
endpoints.MapFallbackToPage("/_Host");We now need to go ahead and create the page. Create a folder called "Pages", and then add a new item. This time, rather than creating a Razor component, we need to create a Razor Page:
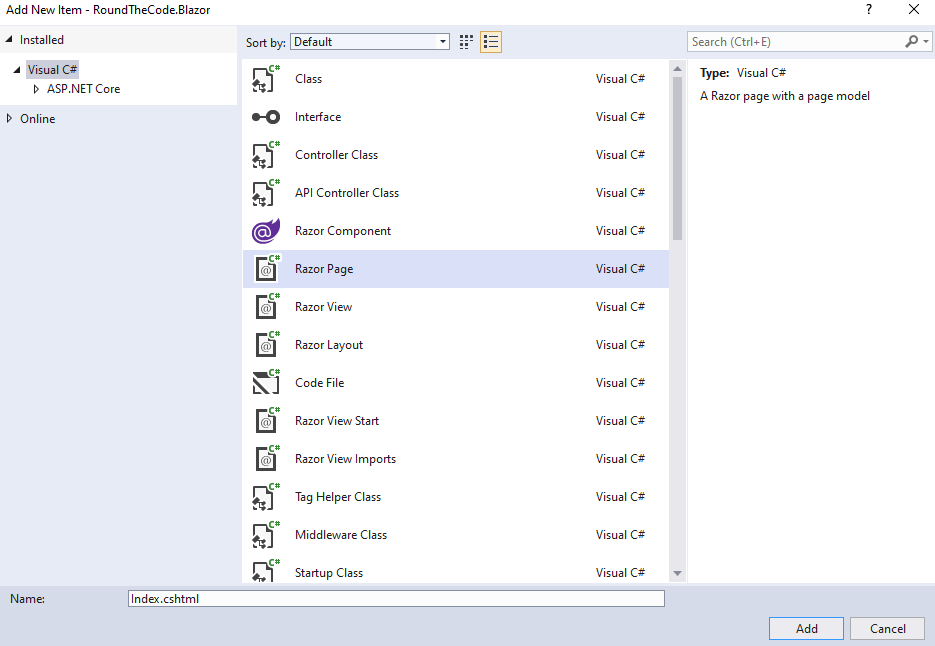
Call it _Host.cshtml and click add. We will then add the following code:
<!-- _Host.cshtml -->
@page "/"
@namespace RoundTheCode.Blazor.Pages
@model _HostModel
@addTagHelper *, Microsoft.AspNetCore.Mvc.TagHelpers
@{
}
<html>
<head>
</head>
<body>
	<app>
		@(await Html.RenderComponentAsync<App>(RenderMode.ServerPrerendered))
	</app>
	<script src="_framework/blazor.server.js"></script>
</body>
</html>
This file basically sets up the SPA. It provides us with our base HTML and where about's in our code we want the Blazor app to run. You may notice that we are calling a reference to "blazor.server.js". As stated earlier, this file allows for communication between the client and the server. This file should already be bundled into the framework.
Now we can go ahead and create the pages. In my example, I've created a Index.razor and Contact.razor inside the Pages folder. I've added the following content to them:
<!-- Index.razor -->
@using Microsoft.AspNetCore.Components.Routing
@page "/"
<h1>Hello, this is the homepage</h1>
<p>Go to the <NavLink href="/contact">Contact</NavLink> page</p>
<!-- Contact.razor -->
@page "/contact"
<h1>Contact Page</h1>
<p>This is the contact page</p>You may notice that a @page reference to these files. This basically dictates the URL of when this content is rendered.
Run your Application
Now you have set up your Blazor application and have learnt how to do it. Run your application and you should be greeted with a page similar to this:

This is rendering Index.razor as we specified "/" in the @page reference at the top of this page. We included a link to the Contact page, which when clicked will direct you to Contact.razor.
One thing you may notice is that when you click on the Contact link, the page content changes without a refresh of the page. This is keeping with how SPA's usually work.
Remember in App.Razor that we set up a <NotFound> tag? Well, if we put in a URL that doesn't exist (like https://localhost:44371/dsfj), it will display our not found message.

Conclusion
That should get you going with your Blazor app. One thing that Blazor can do that other SPA's struggle with is being able to render these pages server-side. That makes it a lot easier for search engines to read the content of your pages. When running the application, view the source and you will see that the content inside your Blazor app has been rendered.
However, at time of publishing this article, it is worth noting that Blazor is still in preview mode and Microsoft have yet to confirm a full release date for Blazor. I personally hope it's not too long away...
A GitHub repository has been created for you to download a copy of the example included in this article.
Related tutorials
Why Blazor Wasm is the best choice for API integration
Why you should use Blazor WebAssembly over JavaScript frameworks for API integration. Examples of integrating a CRUD API in Blazor Wasm.