Binding, child components, parameters and event callbacks in Blazor
Published: Thursday 13 February 2020
We are going to dig deeper into Blazor, and make a very simple application with messages. Now, if you have not read my article entitled "Intro to Blazor and Creating a Blazor App from Scratch", I encourage you to read it first as we are going to be following on from the example built in that article. With that done, lets begin!
We are going to build a message application that allows us to create, update and delete messages. The messages will be stored in a list and displayed as bullet points on our component.
The MessageRecord Class
The first thing we need to do is to create a class that will contain the necessary properties to store our messages. The MessageRecord class will store the following properties: -
- Message (string) - Stores the message being sent
- Sent (DateTimeOffset) - The time when the message was sent
- Verified (bool) - Will be used in an asynchronous example later
The code is as follows:
// MessageRecord.cs
using System;

namespace RoundTheCode.Blazor
{
	public class MessageRecord
	{
		public virtual string Message { get; set; }

		public virtual DateTimeOffset Sent { get; }

		public virtual bool Verified { get; set; }

		public MessageRecord(string message, DateTimeOffset sent)
		{
			Message = message;
			Sent = sent;
		}
	}
}
The Child Component
Creating the child component is next on the list. Inside our Shared folder, we will create a new Razor Component called "MessageItem.razor".
The child component will be responsible for displaying the list of messages on our page. Child components are important if you are reusing code on different parts of the parent component as it allows you to store the code in one place. As a result, it means you can reuse the same code in different areas.
With our child component, we are going to add some event handlers. This will allow us to state what happens when we edit or delete a message. When editing, the onclick handler points to the EditItem function. The EditItem function invokes our OnEdit event callback that we will set in our Messages component later, passing in the reference to the MessageRecord as a parameter. It works in the same way when calling OnDelete. This is how we set up the connection of the events between the child component and the parent component.
The full code is below:
// MessageItem.razor
@using System.Threading;
@using Microsoft.AspNetCore.Components.Web;
<li><strong>@MessageRecord.Sent.ToString("HH:mm:ss")</strong>:@MessageRecord.Message @((MessageRecord.Verified ? " (Verified)" : "")) <button @onclick="@EditItem">Edit</button> <button @onclick="@DeleteItem">Delete</button></li>
@code {
	[Parameter]
	public MessageRecord MessageRecord { get; set; }

	[Parameter]
	public EventCallback<MessageRecord> OnEdit { get; set; }

	[Parameter]
	public EventCallback<MessageRecord> OnDelete { get; set; }

	public MessageItem()
	{
		var t = new Timer(new TimerCallback((object state) => {
			MessageRecord.Verified = true;

			InvokeAsync(() =>
			{
				StateHasChanged();
			});
		}), null, 1000, -1);
	}

	private void EditItem(MouseEventArgs mouseEventArgs)
	{
		if (OnEdit.HasDelegate)
		{
			OnEdit.InvokeAsync(MessageRecord);
		}
	}

	private void DeleteItem(MouseEventArgs mouseEventArgs)
	{
		if (OnDelete.HasDelegate)
		{
			OnDelete.InvokeAsync(MessageRecord);
		}
	}
}
<li> Tag
Going through our code, we have created an <li> tag that contains the message content, the time the message was sent, an edit button and a delete button. With these buttons, we have created some "onclick" event handlers. Eventually, these will call two event callbacks that we have set, but we will make these work in our main messages component.
Now you may find that when you add an event handler to an attribute, it appears in red like so:

This is because you need to include the assembly that the event handlers are stored. In this instance we would need to include the "Microsoft.AspNetCore.Components.Web" assembly, and then the event handler will turn purple.

The Properties
We have created three properties, which are:
- MessageRecord - References the MessageRecord class we created earlier
- OnEdit - An event callback that will eventually manage the way a message is edited
- OnDelete - An event callback that will eventually manage the way a message is deleted
All these properties contain a [Parameter] tag. This [Parameter] tag allows us to set this property from a parent component when it's used.
The Constructor
Another thing we have done is to explicitly call the constructor. Now we named our file "MessageItem.razor". Because of this, our class name for this file is "MessageItem". It takes the name of the file as the class name. Inside our constructor, we are setting a timer function that will be called one second after the timer function has been initialised. This is to demonstrate how asynchronous methods work in Blazor.
After the second has elapsed, we set the Verified property in the "MessageItem" class to true. Now, Blazor does a good job at recognising when a state has changed and when it needs to refresh the content of a component. But sometimes we have to tell Blazor that the state has changed. This is the case with asynchronous methods. You can explicitly tell Blazor that the state has changed by calling the following code:
InvokeAsync(() =>
{
	StateHasChanged();
});
The Messages Component
The final part of our chapter is to create the messages component. Inside the Pages folder, we are going to create a new Razor Component called "Messages.razor". This page allows creating, updating and deleting messages, and being able to see all messages listed. The full code is below:
// Messages.razor
@using Microsoft.AspNetCore.Components.Web
@using RoundTheCode.Blazor.Shared
@page "/messages"
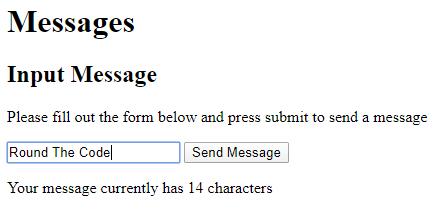
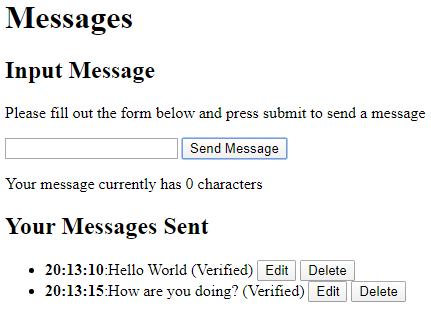
<h1>Messages</h1>
<h2>Input Message</h2>
<p>Please fill out the form below and press submit to send a message</p>
@if (EditMessageRecord == null)
{
<input @bind="MessageInput" @bind:event="oninput" />
<button @onclick="MessageInputClick">Send Message</button>
}
else
{
<input @bind="EditMessageRecord.Message" @bind:event="oninput" />
<button @onclick="EditClose">Close</button>
}
@if (EditMessageRecord == null)
{
<p>Your message currently has @(MessageInput?.Length ?? 0) character@((MessageInput?.Length ?? 0) != 1 ? "s" : "")</p>
}
else
{
<p>Your message currently has @(EditMessageRecord.Message?.Length ?? 0) character@((EditMessageRecord.Message?.Length ?? 0) != 1 ? "s" : "")</p>
}
@if (MessageRecords != null && MessageRecords.Count > 0)
{
<h2>Your Messages Sent</h2>
<ul>
@foreach (var item in MessageRecords.ToList())
{
<MessageItem MessageRecord="item" OnEdit="@MessageEdit" OnDelete="@MessageDelete"></MessageItem>
}
</ul>
}
@code {
private string MessageInput { get; set; }
private List<MessageRecord> MessageRecords { get; set; }
private MessageRecord EditMessageRecord { get; set; }
private void MessageInputClick(MouseEventArgs mouseEventArgs)
{
if (MessageRecords == null)
{
MessageRecords = new List<MessageRecord>();
}
MessageRecords.Add(new MessageRecord(MessageInput, DateTime.UtcNow));
MessageInput = string.Empty;
}
private void MessageEdit(MessageRecord messageRecord)
{
EditMessageRecord = messageRecord;
}
private void MessageDelete(MessageRecord messageRecord)
{
EditMessageRecord = null;
MessageRecords.Remove(messageRecord);
}
private void EditClose()
{
EditMessageRecord = null;
}
}Routing
The first thing we've done is set our routing. Using the @page keyword, we have stated that this component will be called when /messages is requested in the browser.
Input and Binding
Next, we have added an input text box to our component. Now, we have created a EditMessageRecord property in our component and this will be set when we are updating one of our messages. The EditMessageRecord property is an instance of our MessageRecord class that we created earlier and will represent the message that we are updating. The text box shown will be different depending on whether the EditMessageRecord property is set or not.
You may be able to see that we have a @bind and a @bind:event attribute in our input text boxes. The @bind attribute allows us to bind the input tag to a property on our component. The @bind:event allows us to choose when the binding takes place. In this instance, we are binding our input text box to a string property called "MessageInput" and this will be updated every time there is an input to the text box.
We have shown this by counting the number of characters in our input. Every time you type a character into the text box, the number of characters should be displayed and updated to highlight the recent change.
Displaying the Messages
The last thing we are doing is showing the messages that have been sent. In our code, we have created a "MessageRecords" property. This property is a list that stores instances of our "MessageRecord" class that we created earlier.
When we go through our list, we make a call to our MessageItem child component that we made earlier. In this, we pass through our instance of the "MessageRecord" class alongside our event callbacks when a message is updated or deleted.
@if (MessageRecords != null && MessageRecords.Count > 0)
{
	<h2>Your Messages Sent</h2>
	<ul>
		@foreach (var item in MessageRecords.ToList())
		{
			<MessageItem MessageRecord="item" OnEdit="@MessageEdit" OnDelete="@MessageDelete"></MessageItem>
		}
	</ul>
}
Running the Application
A GitHub repository has been created for you to download a copy of the example included in this article.
If you are running the application, go ahead and type a message in. Watch the number of characters change as you type your message and press the "Send Message". The message, along with the time the message was sent will appear underneath. A second later, we put our asynchronous example into practice by the (Verified) text showing.
Now go ahead and edit the message. When we edit the message, we can see the message updated in real time. This is possible by the use of binding. We bound our input textbox to the "Message" property in our "MessageRecord" class.
Time now to delete the message. This removes our message from our "MessageRecords" property and disappears from the list.
And that's our application done! We have now created a simple message application that allows us to create, read, update and delete messages. Pretty simple don't you think?
Related tutorials

Create a Roulette wheel. Game development using Blazor WebAssembly
Use Blazor WebAssembly to create a roulette wheel in one hour! Follow our Blazor Wasm game development tutorial using C#.