The best way to create email templates in .NET
Stop hardcoding or using placeholders in your .NET email templates. This tutorial will show you the best way to create email templates in your ASP.NET Core app which is reusable and scalable.
The problems with hardcoding emails
Here's an example of hardcoding an email template:
public static void SendEmailOrderConfirmation()
{
	var content = @"<html lang=""en"">
		<head>
			<meta charset=""UTF-8"" />
			<meta name=""viewport"" content=""width=device-width, initial-scale=1.0"" />
			<title>Order Confirmation</title>
			<style>
				body {
					margin: 0;
					padding: 0;
					background-color: #f5f5f5;
				}
				table {
					border-spacing: 0;
					border-collapse: collapse;
				}
				img {
					border: 0;
					display: block;
				}
				a {
					color: #0077cc;
					text-decoration: none;
				}
			</style>
		</head>
		<body style=""margin:0; padding:0; background-color:#f5f5f5; font-family: Arial, Helvetica, sans-serif;"">
			...";

	return content;
}
It's astounding that some developers think this is acceptable:
Making the simplest changes to this becomes painful.
No separation of concerns. It mixes business and presentation logic.
Difficult to review in a PR request. The code becomes unreadable.
It doesn't scale. It's difficult to use the same layout in multiple templates.
Better solution using placeholders
A better solution is to load the email template through a HTML file and then replace the placeholders with dynamic values.
public static async Task<string> SendEmailOrderConfirmation(
	OrderConfirmationEmailDto orderConfirmationEmail)
{
	var orderConfirmation = await File.ReadAllTextAsync($"" +
		$"{AppDomain.CurrentDomain.BaseDirectory}Examples/" +
		$"Placeholders/OrderConfirmation.html");

	orderConfirmation = orderConfirmation.Replace("{orderId}",
		orderConfirmationEmail.Id.ToString());

	return orderConfirmation;
}
This is much better as you are separating the business and presentation logic. But it still has its issues:
It's difficult to hide sections for certain users.
Placeholder tags can fail silently. You must remember to replace all placeholder tags.
Awkward with loops. You would have to come up with a system that has multiple items in a loop.
Difficult to reuse the layout.
Introducing Razor Views
Razor Views is a great candidate for creating an email template because you can reuse the layout and you can use a strongly typed model to populate the values.
However, Razor Views is designed to work with controllers, so we need to find a way of generating the HTML as a string.
Talking about controllers, if you are thinking of moving away from them, our Minimal API course shows you how to build a full web API using clean architecture. It's had great feedback and there are also free preview videos so you can explore the setup and decide if it's right for you.
Either way, the next step is to use the Razor View engine to render views without relying on controllers.
Generating the HTML as a string
Here's how you generate a Razor View as a string.
public static async Task<string?> GetEmailContentAsync<TModel>(
	IServiceScopeFactory serviceScopeFactory,
	string viewName,
	TModel model
) where TModel : BaseEmailDto
{
	using var scope = serviceScopeFactory.CreateScope();

	try
	{
		var httpContext = new DefaultHttpContext
		{
			RequestServices = scope.ServiceProvider
		};

		var emailOptions = scope.ServiceProvider.GetRequiredService <IOptionsSnapshot<EmailOptions>>().Value;

		httpContext.Request.Host = new HostString(Regex.Replace(
			emailOptions.Origin,
			@"^http(s)?:\/\/",
			""));

		httpContext.Request.IsHttps = emailOptions.Origin.StartsWith(
			"https");

		httpContext.SetEndpoint(new Endpoint((context) =>
		{
			context.Response.StatusCode = StatusCodes.Status200OK;
			return Task.CompletedTask;
		}, EndpointMetadataCollection.Empty, ""));

		var actionContext = new ActionContext(httpContext, httpContext.GetRouteData(), new ActionDescriptor());

		var razorViewEngine = scope.ServiceProvider
			.GetRequiredService<IRazorViewEngine>();

		var tempDataProvider = scope.ServiceProvider
			.GetRequiredService<ITempDataProvider>();

		var viewResult = razorViewEngine.GetView(null, viewName, false);

		if (!viewResult.Success)
		{
			throw new InvalidOperationException($"Unable to find the " +
				$"view '{viewName}'");
		}

		var viewDictionary = new ViewDataDictionary(new EmptyModelMetadataProvider(), new ModelStateDictionary())
		{
			Model = model
		};

		using var sw = new StringWriter();

		var viewContext = new ViewContext(
			actionContext,
			viewResult.View,
			viewDictionary,
			new TempDataDictionary(actionContext.HttpContext, tempDataProvider),
			sw,
			new HtmlHelperOptions());

		await viewResult.View.RenderAsync(viewContext);

		return sw.GetStringBuilder().ToString();
	}
	catch (Exception ex)
	{
		var loggerFactory = scope.ServiceProvider.GetRequiredService<ILoggerFactory>();
		var logger = loggerFactory.CreateLogger(typeof(EmailHelper).FullName!);

		logger.LogError(ex.Message, ex);

		return null;
	}
}
The IServiceScopeFactory parameter allows us to create a new scope. This is particularly important if you are sending an email in a separate task.
The viewName parameter represents the location of the view you are trying to render. This is important because if it can't be found, the view won't render and your application will throw an exception.
The model parameter allows us to use a strongly typed class to generate the values for the view. This must match the same type in the view.
The method then creates a new DefaultHttpContext instance. We set some properties in the Request property like Host and IsHttps. This helps us populate email links with the full URL.
We then check to see if the view exists and eventually write the HTML to a StringWriter before returning the string.
How to use the method
Here's an example of how to use the method. This was used in a controller for demonstration purposes but EmailHelper > GetEmailContentAsync can be used anywhere.
// OrderConfirmationEmailDto.cs
public class OrderConfirmationEmailDto : BaseEmailDto
{
	public override string Title { get => "Order confirmation"; }

	public int Id { get; set; }

	public DateTime OrderDate { get; set; }

	public IList<OrderConfirmationEmailItemDto> Items { get; set; } = [];

	public decimal SubTotal { get; set; }

	public decimal Shipping { get; set; }

	public decimal Tax { get; set; }

	public decimal Total { get; set; }
}
// OrderConfirmationEmailItemDto.cs
public class OrderConfirmationEmailItemDto
{
public string Sku { get; set; } = string.Empty;
public string Name { get; set; } = string.Empty;
public int Quantity { get; set; }
public decimal Price { get; set; }
}// SendEmailController.cs
[Route("send-email")]
[ApiController]
public class SendEmailController : Controller
{
private readonly IServiceScopeFactory _serviceScopeFactory;
public SendEmailController(IServiceScopeFactory serviceScopeFactory)
{
_serviceScopeFactory = serviceScopeFactory;
}
[HttpGet]
public async Task<IActionResult> Index()
{
var emailContent = await EmailHelper.GetEmailContentAsync(
_serviceScopeFactory,
"~/Views/Email/OrderConfirmation.cshtml",
new OrderConfirmationEmailDto
{
Id = 1,
OrderDate = DateTime.UtcNow,
Items = new List<OrderConfirmationEmailItemDto>
{
new()
{
Sku = "SPWA",
Name = "Sports watch",
Quantity = 1,
Price = 65
},
new()
{
Sku = "PQ",
Name = "Pool cue",
Quantity = 2,
Price = 33
},
},
SubTotal = 104.8m,
Shipping = 5.6m,
Tax = 27.6m,
Total = 138
}
);
return Content(emailContent!, "text/html");
}
}This will output the HTML content that is in Views/Email/OrderConfirmation.cshtml with the dynamic values populated from OrderConfirmationEmailDto.
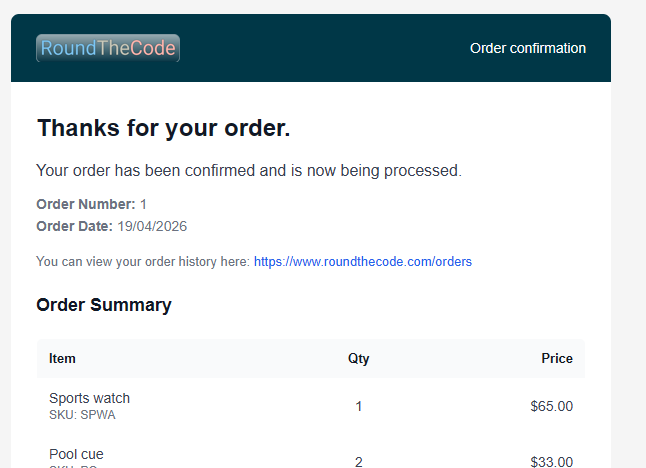
@model OrderConfirmationEmailDto
@{
    Layout = "~/Views/Email/_EmailTemplate.cshtml";
}
<tr>
	<td style="padding: 30px 25px 10px 25px;">
		<!-- Values populated from OrderConfirmationEmailDto -->
		<p style="margin:10px 0 0 0; font-size:14px; line-height:22px; color:#6B7280;">
			<strong>Order Number:</strong> @Model.Id <br>
			<strong>Order Date:</strong> @Model.OrderDate.ToString("dd\\/MM\\/yyyy")
		</p>
		...
Populate values in the layout
When creating a model to use in Razor Views, it's best to inherit a base class if you want to be able to add dynamic values to the layout. This example shows the view model inheriting BaseEmailDto.
// OrderConfirmationEmailDto.cs
public class OrderConfirmationEmailDto : BaseEmailDto
{
	public override string Title { get => "Order confirmation"; }

	...
}
// BaseEmailDto.cs
public class BaseEmailDto : RazorPage<BaseEmailDto>
{
public virtual string Title { get; } = string.Empty;
public override Task ExecuteAsync()
{
return Task.CompletedTask;
}
}For the base class, you must inherit RazorPage setting the base class as a generic type, and override ExecuteAsync.
If you want to populate values in a Razor View layout, you then use @inherits and the base class type to populate the values from the base class properties.
<!-- Views/Email/EmailTemplate.cshtml -->
@inherits BaseEmailDto

<!DOCTYPE html>
<html lang="en">
<head>
<meta charset="UTF-8" />
<meta name="viewport" content="width=device-width, initial-scale=1.0" />

<!-- This can be changed in any model that inherits BaseEmailDto -->
<title>@Model.Title</title>
	<style>
	...
Enable the Razor View engine
If you are using this, you must go into Program.cs and replace AddControllers with AddControllersWithViews(). This will enable the Razor View engine.
builder.Services.AddControllersWithViews();Watch the video
Watch the video where we show you how you can use Razor Views to generate an email template as a string that can be used to send emails.
Latest tutorials

