

Why Blazor Wasm is the best choice for API integration
Published: Monday 31 August 2020
There are many reasons why Blazor WebAssembly (or Blazor Wasm) is the best choice for API integration. It's lightweight. It works offline. And my personal favourite, you can code the integration in C#.
Why use Blazor Wasm for API Integration?
The way Blazor Server works (the other Blazor hosting model) is that you have a constant connection between the client and server through SignalR.
How to Integrate API Integration Into Blazor Wasm?
Now that I've shared with you the many reasons to integrate an API into a Blazor Wasm, it's time to see how we can go ahead and implement it.
Don't we need to Build the API First?
Spot on! We need to build the API.
How to Create in a Blazor Wasm?
Time to create a Razor component in our Blazor Wasm application. We will call it Create.razor.
@using System.Net.Http
@page "/teams/create"
@inject HttpClient httpClient
@inject NavigationManager navigationManager
<h1>Create a Team</h1>
<form @onsubmit="Submit">
	<label for="Name">Name</label>
	<input type="text" name="Name" @bind="Name" /><br />
	<label for="ShirtColour">Shirt Colour</label>
	<input type="text" name="ShirtColour" @bind="ShirtColour" /><br />
	<label for="Location">Location</label>
	<input type="text" name="Location" @bind="Location" /><br />
	<button type="submit">Create Team</button>
</form>
@code {
	public virtual string Name { get; set; }
	public virtual string ShirtColour { get; set; }
	public virtual string Location { get; set; }

	public async Task Submit(EventArgs eventArgs)
	{
		var payload = new { Name, ShirtColour, Location };

		var response = await httpClient.PostAsJsonAsync("https://localhost:2001/api/team", payload);

		if (response.IsSuccessStatusCode)
		{
			var team = await response.Content.ReadFromJsonAsync<Team>();

			navigationManager.NavigateTo("/teams/read/" + team.Id);
		}
	}
}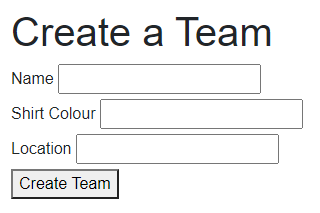
Creating a team in Blazor Wasm using an API
What about Reading a Record in Blazor Wasm?
Again, we need to create a Razor component. That's call it Read.razor.
@page "/teams/read/{id:int}"
@inject HttpClient httpClient
@inject NavigationManager navigationManager

<h1>Viewing Your Team@((Team != null ? " - " + Team.Name : ""))</h1>
@if (Team != null)
{
	<h2>Details</h2>
	<ul>
		<li>Id: @Team.Id</li>
		<li>Name: @Team.Name</li>
		<li>Shirt Colour: @Team.ShirtColour</li>
		<li>Location: @Team.Location</li>
	</ul>
	<h2>Actions</h2>
	<ul>
		<li><a href="/teams/update/@Team.Id">Update</a></li>
		<li><a href="/teams/delete/@Team.Id">Delete</a></li>
	</ul>
}

@code {
	[Parameter]
	public virtual int Id { get; set; }

	public virtual Team Team { get; set; }

	protected override async Task OnParametersSetAsync()
	{
		Team = await httpClient.GetFromJsonAsync<Team>("https://localhost:2001/api/team/" + Id);
	}
}
Reading a team in Blazor Wasm using an API
How Easy is it to Update a Record in Blazor Wasm?
As we are using the partial update, it does require a little bit more work. If you want to know the reasons why we are doing a partial update, read my article "ASP.NET Core MVC API: How to Perform a Partial Update using HTTP PATCH Verb".
// HttpPatchRecord.cs
public class HttpPatchRecord
{
	[JsonPropertyName("op")]
	public string Op { get; set; }

	[JsonPropertyName("path")]
	public string Path { get; set; }

	[JsonPropertyName("value")]
	public string Value { get; set; }
}
This will store the name and value of all the properties we wish to update.
@using System.Net.Http
@using System.Text
@page "/teams/update/{id:int}"
@inject HttpClient httpClient
@inject NavigationManager navigationManager
<h1>Update Team</h1>
@if (Team != null)
{
<form @onsubmit="Submit">
	<label for="Name">Name</label>
	<input type="text" name="Name" @bind="Name" /><br />
	<label for="ShirtColour">Shirt Colour</label>
	<input type="text" name="ShirtColour" @bind="ShirtColour" /><br />
	<label for="Location">Location</label>
	<input type="text" name="Location" @bind="Location" /><br />
	<button type="submit">Update Team</button>
</form>
}
@code {
	[Parameter]
	public virtual int Id { get; set; }

	public virtual Team Team { get; set; }

	public virtual string Name { get; set; }
	public virtual string ShirtColour { get; set; }
	public virtual string Location { get; set; }

	protected override async Task OnParametersSetAsync()
	{
		Team = await httpClient.GetFromJsonAsync<Team>("https://localhost:2001/api/team/" + Id);

		if (Team != null)
		{
			Name = Team.Name;
			ShirtColour = Team.ShirtColour;
			Location = Team.Location;
		}
	}

	public async Task Submit(EventArgs eventArgs)
	{
		var patchObjects = new List<HttpPatchRecord>();
		patchObjects.Add(new HttpPatchRecord { Op = "replace", Path = "/name", Value = Name });
		patchObjects.Add(new HttpPatchRecord { Op = "replace", Path = "/shirtColour", Value = ShirtColour });
		patchObjects.Add(new HttpPatchRecord { Op = "replace", Path = "/location", Value = Location });

		var json = System.Text.Json.JsonSerializer.Serialize(patchObjects);
		var httpContent = new StringContent(json, Encoding.UTF8, "application/json");

		var response = await httpClient.PatchAsync("https://localhost:2001/api/team/" + Id, httpContent);

		if (response.IsSuccessStatusCode)
		{
			var team = await response.Content.ReadFromJsonAsync<Team>();

			navigationManager.NavigateTo("/teams/read/" + team.Id);
		}
	}
}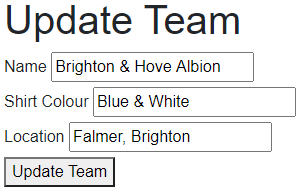
Updating a team in Blazor Wasm using an API
Don't Forget Deleting a Record in Blazor Wasm!
This is pretty simple as we have the principles in place from the other three methods.
@page "/teams/delete/{id:int}"
@inject HttpClient httpClient
@inject NavigationManager navigationManager
<h1>Delete Team@((Team != null ? " - " + Team.Name : ""))</h1>
@if (Team != null)
{
	<form @onsubmit="DeleteTeam">
		<button type="submit">Delete this Team</button>
	</form>
}
@code {
	[Parameter]
	public virtual int Id { get; set; }

	public virtual Team Team { get; set; }

	protected override async Task OnParametersSetAsync()
	{
		Team = await httpClient.GetFromJsonAsync<Team>("https://localhost:2001/api/team/" + Id);
	}

	public async Task DeleteTeam(EventArgs eventArgs)
	{
		var response = await httpClient.DeleteAsync("https://localhost:2001/api/team/" + Team.Id);

		if (response.IsSuccessStatusCode)
		{
			var team = await response.Content.ReadFromJsonAsync<Team>();

			navigationManager.NavigateTo("/teams/read/" + team.Id);
		}
	}
}
Deleting a team in Blazor Wasm using an API
Watch the Tutorial
You can watch the tutorial where we use an ASP.NET Core MVC API and Blazor Wasm to produce CRUD modules with integrating with the API.
Where next for API Integration?
Now that you've got the hang of writing and integrating API endpoints for Blazor Wasm, you've probably got a lot of the foundations in place. I suspect that the fast majority of your endpoints are going to be CRUD related.
Related tutorials

Keyed services in .NET 8 finally sees a dependency injection update
.NET 8 brings keyed services, a dependency injection update for creating the same service with a different implementation in the IoC container.