
EF Core without migrations - it's only a matter of time

If you're using Entity Framework Core without migrations, you're asking for trouble. Your local database won't match production, deployments become risky, and small schema changes can turn into big problems. We'll show you why you need them and how to add them to your application.
The benefits of using migrations
We've seen the benefits of using migrations over many years.
Generate SQL commands for the database
When you add a migration, it creates a script in the Migrations folder. This generates SQL commands for the database.
public partial class AddProduct : Migration
{
    /// <inheritdoc />
    protected override void Up(MigrationBuilder migrationBuilder)
    {
        migrationBuilder.CreateTable(
            name: "Products",
            columns: table => new
            {
                Id = table.Column<int>(type: "int", nullable: false)
                    .Annotation("SqlServer:Identity", "1, 1"),
                Name = table.Column<string>(type: "nvarchar(100)", maxLength: 100, nullable: false),
                Deleted = table.Column<DateTime>(type: "datetime2", nullable: true)
            },
            constraints: table =>
            {
                table.PrimaryKey("PK_Products", x => x.Id);
            });
    }

    /// <inheritdoc />
    protected override void Down(MigrationBuilder migrationBuilder)
    {
        migrationBuilder.DropTable(
            name: "Products");
    }
}
Without this, it would be very time-consuming to keep your database in sync with your code.
Tracking changes in the Git repository
Migrations allow you to track database schema changes in your Git repository.
Without this, if you wanted to roll back a change, you wouldn't know which developer made it or what changes were made.
Consistency across environments
Migrations provide consistency across environments. Each developer can run the update database command to sync their database with the changes in the code.
Without this, a developer may forget to apply a schema change locally, or worse, the production database may differ from local.
Generate, review and automate deployment
Migrations allow you to generate, review and automate deployments.
Without this, you may forget to review or run the deployment script, leading to potential runtime issues.
Adding migrations
The first step is to migrate the Product entity to the database.
// Product.cs
public class Product
{
    public int Id { get; init; }
    public string Name { get; set; } = string.Empty;
    public DateTime? Deleted { get; set; }
}
This is done by installing the Microsoft.EntityFrameworkCore.Design and Microsoft.EntityFrameworkCore.Tools NuGet packages.
Configuring the Product entity
Before adding the migration, we need to configure Product. We'll add this in a separate class.
To do this, we implement IEntityTypeConfiguration using the entity as the generic type. This interface includes Configure, where we define the configuration.
This example sets the Id property as the primary key.
By default, if you don't specify a maximum length on string properties, EF Core will use nvarchar(max). This can negatively impact performance when querying.
Therefore, we set the maximum length of Name to 100 characters.
If you don't specify a table name, the migration uses the entity name by default. This can be overridden using ToTable.
// ProductConfiguration.cs
public class ProductConfiguration : IEntityTypeConfiguration<Product>
{
    public void Configure(EntityTypeBuilder<Product> builder)
    {
        builder.HasKey(x => x.Id);

        builder.Property(x => x.Name)
            .HasMaxLength(100);

        builder
            .HasOne<Category>()
            .WithMany()
            .HasForeignKey(x => x.CategoryId)
            .IsRequired(false);

        builder.ToTable("Products");
    }
}
However, this will not work without overriding OnModelCreating in the DbContext and applying configurations from the assembly.
If the configurations are in the same assembly as the DbContext, the easiest way is to call ApplyConfigurationsFromAssembly using the context's assembly.
// EFMigrationsDbContext.cs
public class EFMigrationsDbContext : DbContext
{
    ...

    protected override void OnModelCreating(ModelBuilder modelBuilder)
    {
        modelBuilder.ApplyConfigurationsFromAssembly(typeof(EFMigrationsDbContext).Assembly);
    }
}
Add the migration
In Visual Studio, go to Tools > NuGet Package Manager > Package Manager Console.
Ensure the default project is set to the one containing your EF Core packages, and the startup project is set to one with the connection string (such as your API project).
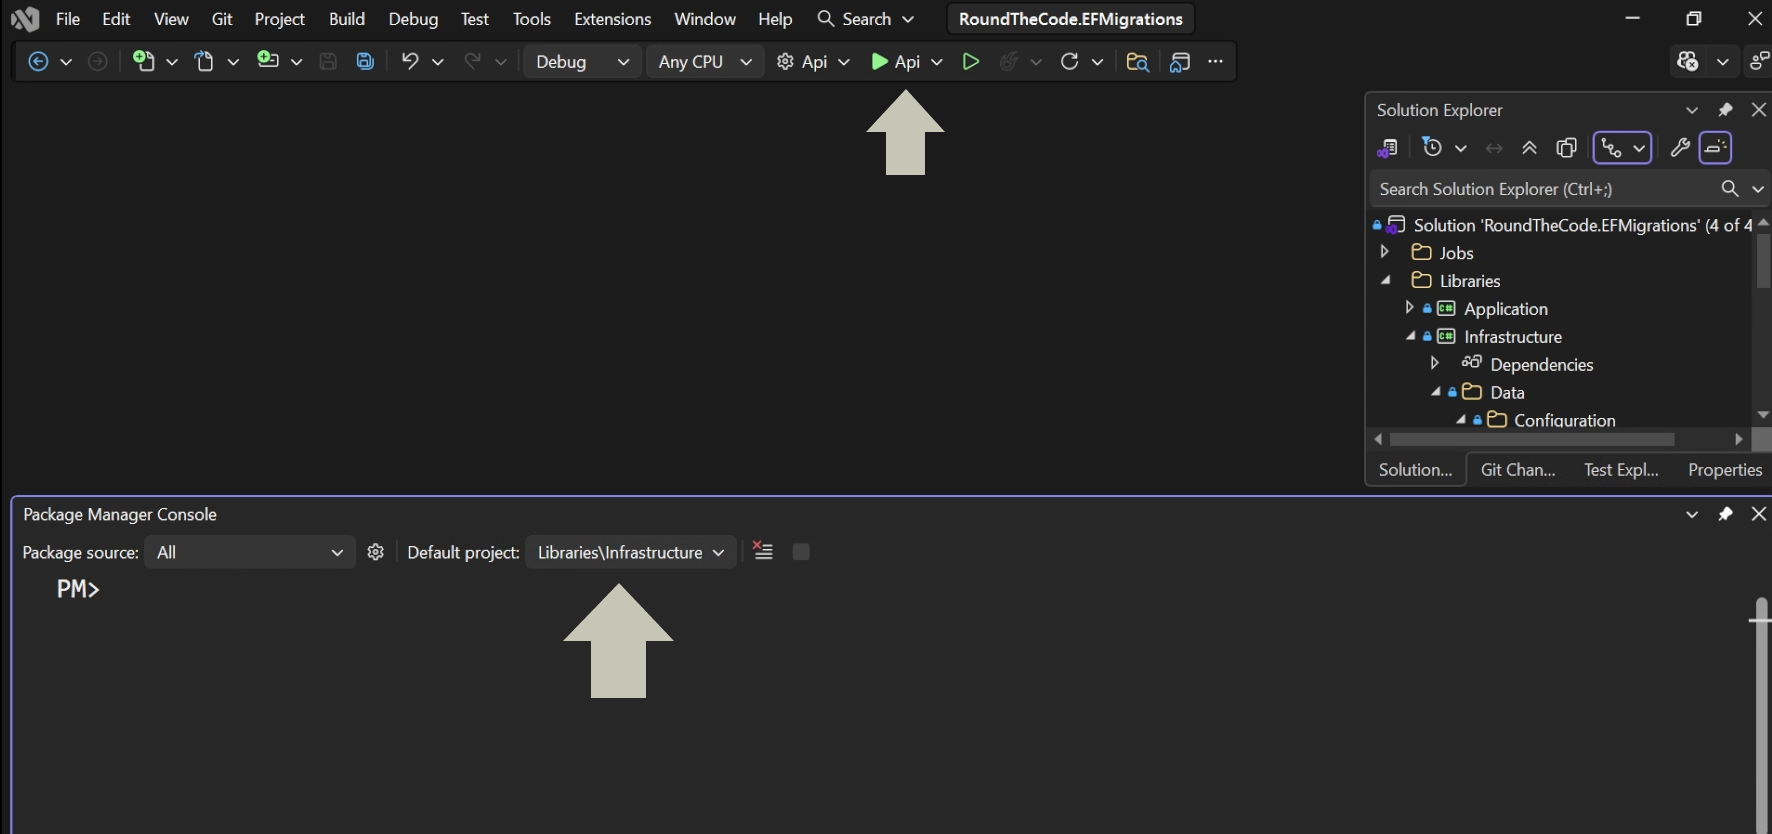
Run Add-Migration {Name}, replacing {Name} with your desired migration name. This creates a migration script in the Migrations folder.
Once you're happy, run Update-Database to apply the migration.
Using the CLI
If you're using the CLI, install the dotnet-ef tool:
dotnet tool install --global dotnet-ef
To add a migration, navigate to your solution folder and run:
dotnet ef migrations add AddProducts --project {Project} --startup-project {StartupProject}
To update the database:
dotnet ef database update --project {Project} --startup-project {StartupProject}
Remember to update {Project} with the name of the project where you've installed Entity Framework Core, and {StartupProject} with the name of the project that has the connection strings, like the API.
Once the database is updated
This will create the database if it doesn't already exist and apply the migration.
It will also create a table called dbo.__EFMigrationsHistory, which logs all executed migrations and corresponds to filenames in the Migrations folder.
Using migrations in a real-world application
Now that you've applied your first migration, the next step is using it in a real-world application.
This is covered in our Minimal API course, where we demonstrate adding migrations to a Web API project. It has received great feedback, and free preview videos are available to get you started.
Joining tables
We can now explore more complex migrations, such as joining tables.
We are going to join the Category table with the Product table. We've added a CategoryId to Product, and this will join with Category.Id.
// Product
public class Product
{
    ...
    public int? CategoryId { get; set; }
}
// Category.cs
public class Category
{
public int Id { get; set; }
public string Name { get; set; } = string.Empty;
}// CategoryConfiguration.cs
public class CategoryConfiguration : IEntityTypeConfiguration<Category>
{
public void Configure(EntityTypeBuilder<Category> builder)
{
builder.HasKey(x => x.Id);
builder.Property(x => x.Name)
.HasMaxLength(100);
builder.ToTable("Categories");
}
}Unless you are using navigation properties, additional configuration is required to join the tables together.
Add the following to ProductConfiguration:
// ProductConfiguration.cs
public class ProductConfiguration : IEntityTypeConfiguration<Product>
{
    public void Configure(EntityTypeBuilder<Product> builder)
    {
        ...
        builder
            .HasOne<Category>()
            .WithMany()
            .HasForeignKey(x => x.CategoryId)
            .IsRequired(false);
    }
}
You can then add the migration and update the database. This will create the Category table, update Product with CategoryId, and establish the relationship.
Seed data
If your data is consistent across environments, you may want to pre-populate it.
Here, we populate the Categories table with Electronics and Gaming using HasData.
// CategoryConfiguration.cs
public class CategoryConfiguration : IEntityTypeConfiguration<Category>
{
    public void Configure(EntityTypeBuilder<Category> builder)
    {
        ...
        builder.HasData([
            new() { Id = 1, Name = "Electronics" },
            new() { Id = 2, Name = "Gaming" }
        ]);
    }
}
After adding and running the migration, the data will be inserted into the table.
Other configurations
There are additional configurations available:
HasColumnNameallows you to change the database column name.HasDefaultValuelets you define a default value.
Try it out for yourself as there are many other configurations you can apply.
You can also execute raw SQL by creating a migration and calling Sql:
public partial class RunRawSql : Migration
{
    /// <inheritdoc />
    protected override void Up(MigrationBuilder migrationBuilder)
    {
        migrationBuilder.Sql("{SQLCommand}");
    }

    ...
}
There's also a way to run migrations as a background service to support CI/CD deployments. You can learn more in the video below.
Related tutorials

